


Brick it® Knowledge Center
Purchasing
Estimating Brick Masonry
Estimating brick masonry involves calculating the quantity of bricks, mortar, and other necessary materials, along with labor costs and potential waste. Accuracy is key to budgeting and building efficiently.
How It Works:
- Calculate the net wall area (total area minus windows, doors, etc.).
- Multiply by the material quantity needed per square foot (or square meter).
Want precision? - Use our Material Configurator for accurate, hassle-free estimates!
Brick Breakage & Waste Policy
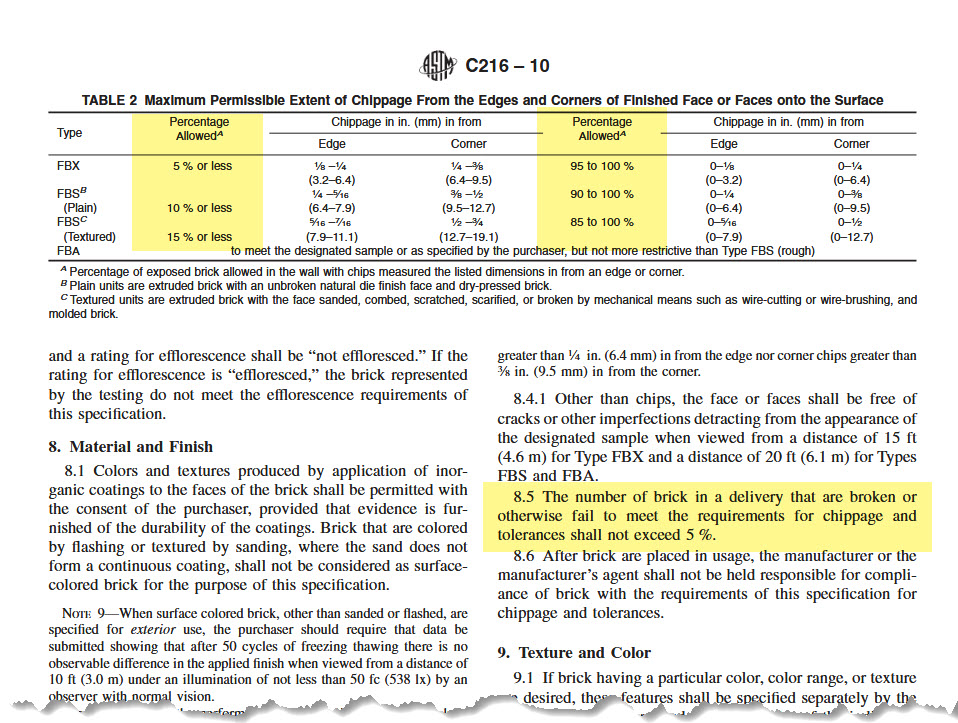
Brick waste and chippage allowances are guided by ASTM standards, which typically permit 5–10% of a shipment to include chipped or broken bricks.
When estimating brick quantities:
Calculate the net number of bricks required.
Add at least 5% extra to account for breakage and waste during transport and installation.
Standard Allowance: +5–10%
Higher Waste Rate? Use more if your project involves complex cuts, tough site conditions, or rough handling.
Source: Brick Industry Association
Brick It Return Policy – All Sales Are Final
For the Benefit of Our Customers
At Brick It, we are committed to delivering only fresh, high-quality materials manufactured from a single, consistent production lot. To maintain this standard and to ensure every customer receives uncompromised products, we do not accept returns on any merchandise.
Why No Returns?
Our no-return policy is not just about logistics, it's about protecting product integrity. Once materials leave our facility, they can no longer be guaranteed uncontaminated or unused. By eliminating the possibility of reselling returned goods, we ensure that:
- Every order is made-to-order from new stock
- You receive pristine materials, never leftovers, repackaged, or returned items
- Your build starts with quality you can trust
Order Modifications & Cancellations
Changes or cancellations may be possible within 24–48 hours of ordering, depending on the order's production status. Please contact our team as soon as possible to request changes.
Unclaimed Orders
Orders not picked up or delivered within 60 days of readiness will be discarded and invoiced in full. Storage space is limited, and materials are made specifically for each customer.
Pro Tip: "Measure Twice, Click Once!"
Due to our quality-first production model, please double-check your measurements and needs before placing your order.
Does Brick It Sell to the Public?
Yes! Brick It sells to everyone — from homeowners and DIY enthusiasts to contractors, architects, and large commercial clients like chain stores and restaurants. Their streamlined process allows consistent brick sourcing across multiple locations, eliminating the hassle of local material variability.
Key Points:
- Open to all types of customers, no project too big or small.
- Ideal for businesses needing uniform brick aesthetics across different sites.
- Orders are custom and involve real labor and costs — hence, cancellations and returns are generally not feasible.
- This is a low-margin industry, so perks like free shipping aren't usually possible.
Does Brick It collect sales tax in my state?
Brick It collects sales tax in states where we are registered, in compliance with local tax laws. We continuously monitor and adapt to economic nexus regulations as they evolve. Please note that sales tax is calculated based on the "ship to" address of your order.
If you are tax-exempt or have a valid resale certificate, please provide the appropriate documentation prior to placing your order so we can process it accordingly.
How do I make a purchase?
You can purchase our products directly through our website or contact us for live assistance, available Monday–Friday from 8:00 AM to 4:30 PM EST. Pricing is influenced by several factors, including the product selected, manufacturing origin, shipping warehouse, job site location, and order size.
For quoting, bidding, or budgeting purposes, customers can use our website to configure products and generate pricing estimates. Alternatively, feel free to reach out to our team for personalized support during business hours.
How is Brick It product shipped? What are the available shipping methods?
Shipping methods vary based on the size and weight of the order. Samples and small orders (up to 150 lbs) are typically shipped via parcel carriers such as UPS or FedEx. Most standard orders are shipped on pallets using LTL (Less Than Truckload) freight services, while larger orders exceeding 20,000 lbs are shipped via FTL (Full Truckload). We also offer shipping via rail and sea containers when applicable. Air freight is rarely used due to the product’s weight. Please note: like most construction material deliveries, shipments are typically limited to curbside drop-off.
Thin Brick
How Much Extra Product Should I Order When Purchasing Cut Brick?
For most straightforward thin brick projects, we recommend ordering approximately 3–4% extra material to account for cuts, waste, and breakage. When purchasing cut brick specifically, it’s wise to increase that overage slightly due to the cutting process. For machine-molded bricks, plan for at least 5–6% overage, and for hand-molded or reclaimed/used products, 7–10% is recommended. The Brick Industry Association (BIA) suggests even higher allowances depending on brick type and project complexity. It's always better to order a bit more upfront than risk delays due to shortages.
Are All Brick-It Thin Brick Veneers Cut from Full Brick?
Not all of Brick-It’s thin brick veneers are cut from full brick. We offer a large selection of manufactured thin brick that is made to standard thin veneer specifications. However, to expand our offerings and meet the demand for unique colors, textures, and specific matches, we also provide a brick-cutting service. Cutting full-size bricks into veneers allows us to offer options that may not be available in manufactured thin brick form. Please note that not every brick type can be successfully cut into thin veneer due to its composition or structure.
Is Cut Brick Better Than Manufactured Thin Brick?
Both cut brick and manufactured thin brick are high-quality options, and each has its place depending on the project. Cut brick offers the benefit of matching existing full brick when a perfect color or texture match is needed. Manufactured thin brick, on the other hand, is purpose-made to specific dimensions and may be more cost-effective when readily available. At Brick It, we often say: “If it’s available in thin brick, don’t cut it.” Cutting is best reserved for cases where a specific match or unique brick is required.
When Full Bed Brick Is Cut Into a Veneer, What Thickness Do You Cut It At?
While not all thin bricks we offer are cut from full bed brick, those that are are typically cut to a standard thickness of 5/8 or 3/4 inch. However, we can customize the thickness upon request to meet specific design or architectural requirements. This flexibility is especially useful for details such as rowlock bands, quoins, chimney accents, and other decorative elements that may call for a thicker profile.
Is Thin Brick Less Expensive Than Full Brick? How Does It Compare?
Thin brick is not intended to replace full brick in structural applications, but rather to provide a practical alternative where full-depth masonry is not feasible or cost-effective. While the material cost of thin brick can sometimes be comparable or even slightly higher than that of full brick, the overall installed cost is typically lower. This is because thin brick requires no foundations, footings, or lintels, and its lighter weight simplifies installation. The savings are especially significant in renovation projects, where thin brick can be applied without excavation or disruption to existing landscaping or structures.
What is Thin Brick?
Thin brick is a real clay masonry unit designed to replicate the appearance of traditional full-size brick at a fraction of the thickness. Brick It thin brick is kiln-fired and manufactured to meet ASTM C1088 standards for thin veneer units. It is made for severe weather conditions and typically does not exceed a thickness of 1 ¾ inches.
What Thin Brick Sizes Are Available at Brick It?
Brick It offers thin brick in all standard industry sizes. The most popular is the Modular (MOD) size, with a face dimension of 2 1/4" x 7 5/8". Other sizes are also available to accommodate specific project requirements. When purchasing metal panel systems separately, it is important to confirm the brick height to ensure accurate panel compatibility.
What are the Applications for Thin Brick?
Thin brick is a versatile cladding material used in residential, commercial, and industrial projects. It delivers the look of traditional brick without the added weight or structural requirements. Common applications include interior and exterior walls, fireplaces, backsplashes, facades, entryways, and storefronts. It can be installed over wood, metal, concrete, or drywall using adhesive or panel systems. Thin brick is also popular for restaurants, amusement parks, signage, chimneys, and ceiling accents.
Does Brick It Sell Fake, Faux, or Imitation Bricks?
No. All the bricks we offer are authentic kiln-fired clay units. We do not sell fake, faux, or imitation bricks made from plastic, foam, or other synthetic materials.
Our thin bricks are simply real bricks. Some choices have been cut from full-size units to achieve a thinner profile, maintaining the same durability, appearance, and longevity as traditional masonry.
What Is the Insulation Value of Thin Brick?
Thin brick offers minimal insulation on its own. Its R-value (a measure of thermal resistance) is very low—typically around R-0.05 to R-0.1 for a standard ½-inch thick brick. For comparison:
- Thin brick (½"): ~R-0.05 to R-0.1
- Standard full-size clay brick (approx. 2.75"): ~R-0.2 per inch, or about R-0.5 to R-0.6 total
While thin brick provides the appearance and durability of real masonry, it is not intended to act as an insulator. If energy efficiency or code compliance is a concern, you should incorporate dedicated insulation materials (such as rigid foam or continuous insulation systems) into your wall assembly.
For improved thermal performance, consider using our Continuous Insulation System (CI), which combines thin brick with integrated foam insulation and proper fastening methods.
I’d Like to Paint My Brick Wall. What Can I Use?
For painting a brick wall, we generally recommend using a high-quality exterior acrylic latex paint. This type of paint is:
- Durable and designed to withstand outdoor elements
- Offers excellent coverage
- Breathable, which helps prevent moisture buildup inside the brick
However, brick is a porous material, and painting it is often a permanent decision. That’s why we strongly recommend consulting with a painting professional before beginning your project.
Many paint manufacturers offer products specifically formulated for masonry, and your local paint retailer can be a valuable resource. Depending on your specific application, you should ask about:
- Water repellency
- Breathability
- Mildew resistance
- UV protection (for exterior use)
Always test your chosen paint on a small area first to ensure it delivers the finish and performance you expect.
Does Thin Brick Require Maintenance?
In most cases, brick veneer does not require regular maintenance. Thin brick and full bricks are durable and low-maintenance materials. However, if cleaning becomes necessary, we recommend using products specifically formulated for masonry and following the manufacturer’s instructions closely.
What Is Glazed Brick?
Glazed bricks are extruded bricks that have a glaze applied in a separate step, often at a different facility. During firing, the glaze becomes part of the brick surface, creating a smooth, durable, and uniform finish. Glazed bricks come in a wide range of colors and may include speckled or decorative effects.
What Is Handmade Brick?
Handmade bricks offer old-world charm and craftsmanship. Each brick is individually formed in wooden molds, giving it a unique texture and character. No two bricks are exactly alike, making them ideal for historically inspired or custom projects.
What Is Tumbled Brick?
Tumbled bricks are extruded and fired bricks that are intentionally distressed to give them a weathered or aged appearance. This can be done through mechanical tumbling or by applying a textured pattern to the surface before or after firing.
What Is Extruded Brick?
Extruded bricks are made by pushing the brick material through a die under very high pressure, creating a long strip that is then sliced into individual bricks. These bricks typically have sharp, uniform edges and may be textured in various ways for visual interest. Bricks with holes in the center are often extruded.
What Is Molded Brick?
If you like soft, irregular shapes and a sand texture, then molded brick is a great choice. Molded bricks are made by filling a box mold with brick material, vibrating it, and then releasing it. This process gives each brick a distinctive and more traditional appearance.
Does This Product Contribute to LEED Certification and Sustainable Building Practices?
Our product supports sustainable building practices and may contribute to LEED® certification under the U.S. Green Building Council (USGBC). It qualifies for several credits under LEED-NC v2.2 and LEED 2009, including:
Materials and Resources (MR):
MR Credit 3 – Resource Reuse: Incorporates salvaged, refurbished, or reused materials.
MR Credit 4 – Recycled Content: Contains both pre-consumer and post-consumer recycled content.
MR Credit 5 – Regional Materials: May qualify as a local material depending on the project’s proximity to the manufacturing location.
Indoor Environmental Quality (EQ):
EQ Credit 4.1 – Low-Emitting Materials: Adhesives & Sealants: Compatible low-VOC adhesive options available.
Innovation in Design (ID):
ID Credit 1 – Innovation in Design: System design and efficiency may contribute to innovation credits through performance or methodology.
Additionally, our product is recyclable or biodegradable after use, contributing to waste reduction strategies.
For more information on LEED credits and guidelines, please visit www.usgbc.org.
I need to match an existing brick. Can you help?
Yes, we have a large brick library and also offer brick cutting services that allow us to convert many full bricks into thin veneer. While not all bricks are available in thin format, cutting full-size bricks can significantly increase the chances of a successful match.
To begin the matching process, please provide:
- Three photos of the existing wall.
- Close-up (1–2 ft) to show texture
- Mid-range (4–5 ft) to show color variation
- Overall view for context
- Brick dimensions (Height × Length × Depth)
- Quantity needed
- Estimated project start date
Once we receive this information, our team can assess your match request and recommend the best available options.
Can I hang pictures, awnings, or attach fixtures to thin brick veneer?
Thin brick veneer is non-structural and not designed to support loads. We generally do not recommend fastening directly into the veneer. Instead, anchor fixtures to the underlying wall structure before applying the veneer.
Best Practices:
- Plan in advance: install backing or supports (e.g., blocking or junction boxes) behind the veneer during rough-in
- For items like sconces, it's acceptable to mount them on a junction box that is securely fastened to the wall
- Ensure all penetrations are properly sealed to maintain water-tightness
- For heavier items such as awnings or shelves, always consult a structural professional and coordinate mounting details before veneer installation.
How does wall deflection affect thin brick veneer installations?
For masonry or concrete substrates, wall deflection is typically not a concern, since the substrate and veneer have similar stiffness. However, when installing thin brick over wood or steel stud framing, deflection must be carefully controlled due to the difference in stiffness between the veneer and the frame.
Code Guidelines:
- The International Building Code (IBC) limits stud wall deflection to L/240 when rigid finishes like thin brick are applied.
- For interior adhered veneer supported by wood floors, vertical floor deflection is limited to L/600.
- A more conservative L/360 limit is recommended to minimize cracking and prevent veneer separation when using stud framing.
- Proper structural design and framing practices are essential for ensuring a durable, long-lasting veneer installation, especially over flexible substrates.
Is a water-resistive barrier (WRB) and drainage system required behind thin brick veneer?
Yes. Both the International Residential Code (IRC) and the International Building Code (IBC) require exterior walls to include:
A water-resistive barrier (WRB)
A means of drainage behind the veneer, with limited exceptions
General Requirements:
WRB must be installed over sheathing or studs in framed wall assemblies
Assemblies tested to ASTM E331 for wind-driven rain resistance may also be exempt
Material Standards:
Acceptable WRB: One layer of No. 15 asphalt felt (ASTM D226, Type I) or other approved material
Over wood-based sheathing:
Use two layers of vapor-permeable WRB (equivalent to Grade D paper), or
A single high-performance WRB (60-minute Grade D equivalent) separated from the veneer by a drainage space or non-absorbent layer
Means of Drainage:
While code does not prescribe exact materials, products such as drainage mats are commonly used and preferred
Brick It’s MCS and CI systems incorporate designed drainage solutions that meet these requirements
WRBs are not required for interior applications, but may still be helpful in preventing moisture damage during installation.
For full compliance, consult your local building codes or refer to the IBC/IRC.
What are the clearance requirements for installing thin brick veneer near grade or paving?
According to the International Residential Code (IRC) and International Building Code (IBC), exterior thin brick veneer over stud walls must maintain minimum clearances for durability and moisture protection:
- 4 inches (102 mm) above finished grade
- 2 inches (51 mm) above paved surfaces
- ½ inch (12 mm) above exterior walking surfaces supported by the same foundation
- Thin brick must also extend at least 1 inch (25 mm) below the top of the concrete or masonry foundation wall
These requirements help prevent moisture damage and ensure long-term performance. Always verify with local building codes or your project’s design professional for compliance.
Can I order product samples before placing a full order?
Yes, sample boards are often sufficient for initial evaluation. However, for larger projects, we recommend building a field panel (also called a mock-up or field sample) to finalize product selection and set quality expectations. This freestanding panel, typically about 15 sq. ft., serves as the on-site reference standard for brick bond, mortar, workmanship, and appearance.
Use our [Material Calculator] to estimate the materials needed for constructing your panel. It's usually the responsibility of the general contractor and mason to maintain the field panel until final project approval.
Product samples can be ordered directly from each brick’s product page on our website. Mortar color samples are available under the “Mortar” tab. For custom requests, feel free to [contact us].
What kind of maintenance is required for thin brick veneer?
Thin brick systems are known for their durability and low maintenance. When properly installed, they typically require little upkeep. Still, it’s recommended to inspect the veneer at least once a year. Focus on key areas such as sealant joints, mortar condition, alignment of the wall, and any signs of movement or cracking. Early detection of issues allows for simple repairs before more serious problems arise. Regular cleaning with low-pressure water and non-acidic solutions can help maintain appearance, if needed.
Brick Breakage & Waste Policy
Brick waste and chippage allowances are guided by ASTM standards, which typically permit 5–10% of a shipment to include chipped or broken bricks.
When estimating brick quantities:
Calculate the net number of bricks required.
Add at least 5% extra to account for breakage and waste during transport and installation.
Standard Allowance: +5–10%
Higher Waste Rate? Use more if your project involves complex cuts, tough site conditions, or rough handling.
Source: Brick Industry Association
Full Brick
How Much Extra Product Should I Order When Purchasing Cut Brick?
For most straightforward thin brick projects, we recommend ordering approximately 3–4% extra material to account for cuts, waste, and breakage. When purchasing cut brick specifically, it’s wise to increase that overage slightly due to the cutting process. For machine-molded bricks, plan for at least 5–6% overage, and for hand-molded or reclaimed/used products, 7–10% is recommended. The Brick Industry Association (BIA) suggests even higher allowances depending on brick type and project complexity. It's always better to order a bit more upfront than risk delays due to shortages.
What Is the Insulation Value of Thin Brick?
Thin brick offers minimal insulation on its own. Its R-value (a measure of thermal resistance) is very low—typically around R-0.05 to R-0.1 for a standard ½-inch thick brick. For comparison:
- Thin brick (½"): ~R-0.05 to R-0.1
- Standard full-size clay brick (approx. 2.75"): ~R-0.2 per inch, or about R-0.5 to R-0.6 total
While thin brick provides the appearance and durability of real masonry, it is not intended to act as an insulator. If energy efficiency or code compliance is a concern, you should incorporate dedicated insulation materials (such as rigid foam or continuous insulation systems) into your wall assembly.
For improved thermal performance, consider using our Continuous Insulation System (CI), which combines thin brick with integrated foam insulation and proper fastening methods.
I’d Like to Paint My Brick Wall. What Can I Use?
For painting a brick wall, we generally recommend using a high-quality exterior acrylic latex paint. This type of paint is:
- Durable and designed to withstand outdoor elements
- Offers excellent coverage
- Breathable, which helps prevent moisture buildup inside the brick
However, brick is a porous material, and painting it is often a permanent decision. That’s why we strongly recommend consulting with a painting professional before beginning your project.
Many paint manufacturers offer products specifically formulated for masonry, and your local paint retailer can be a valuable resource. Depending on your specific application, you should ask about:
- Water repellency
- Breathability
- Mildew resistance
- UV protection (for exterior use)
Always test your chosen paint on a small area first to ensure it delivers the finish and performance you expect.
Does Thin Brick Require Maintenance?
In most cases, brick veneer does not require regular maintenance. Thin brick and full bricks are durable and low-maintenance materials. However, if cleaning becomes necessary, we recommend using products specifically formulated for masonry and following the manufacturer’s instructions closely.
What Is Glazed Brick?
Glazed bricks are extruded bricks that have a glaze applied in a separate step, often at a different facility. During firing, the glaze becomes part of the brick surface, creating a smooth, durable, and uniform finish. Glazed bricks come in a wide range of colors and may include speckled or decorative effects.
What Is Handmade Brick?
Handmade bricks offer old-world charm and craftsmanship. Each brick is individually formed in wooden molds, giving it a unique texture and character. No two bricks are exactly alike, making them ideal for historically inspired or custom projects.
What Is Tumbled Brick?
Tumbled bricks are extruded and fired bricks that are intentionally distressed to give them a weathered or aged appearance. This can be done through mechanical tumbling or by applying a textured pattern to the surface before or after firing.
What Is Extruded Brick?
Extruded bricks are made by pushing the brick material through a die under very high pressure, creating a long strip that is then sliced into individual bricks. These bricks typically have sharp, uniform edges and may be textured in various ways for visual interest. Bricks with holes in the center are often extruded.
What Is Molded Brick?
If you like soft, irregular shapes and a sand texture, then molded brick is a great choice. Molded bricks are made by filling a box mold with brick material, vibrating it, and then releasing it. This process gives each brick a distinctive and more traditional appearance.
Does This Product Contribute to LEED Certification and Sustainable Building Practices?
Our product supports sustainable building practices and may contribute to LEED® certification under the U.S. Green Building Council (USGBC). It qualifies for several credits under LEED-NC v2.2 and LEED 2009, including:
Materials and Resources (MR):
MR Credit 3 – Resource Reuse: Incorporates salvaged, refurbished, or reused materials.
MR Credit 4 – Recycled Content: Contains both pre-consumer and post-consumer recycled content.
MR Credit 5 – Regional Materials: May qualify as a local material depending on the project’s proximity to the manufacturing location.
Indoor Environmental Quality (EQ):
EQ Credit 4.1 – Low-Emitting Materials: Adhesives & Sealants: Compatible low-VOC adhesive options available.
Innovation in Design (ID):
ID Credit 1 – Innovation in Design: System design and efficiency may contribute to innovation credits through performance or methodology.
Additionally, our product is recyclable or biodegradable after use, contributing to waste reduction strategies.
For more information on LEED credits and guidelines, please visit www.usgbc.org.
Can I hang pictures, awnings, or attach fixtures to thin brick veneer?
Thin brick veneer is non-structural and not designed to support loads. We generally do not recommend fastening directly into the veneer. Instead, anchor fixtures to the underlying wall structure before applying the veneer.
Best Practices:
- Plan in advance: install backing or supports (e.g., blocking or junction boxes) behind the veneer during rough-in
- For items like sconces, it's acceptable to mount them on a junction box that is securely fastened to the wall
- Ensure all penetrations are properly sealed to maintain water-tightness
- For heavier items such as awnings or shelves, always consult a structural professional and coordinate mounting details before veneer installation.
How does wall deflection affect thin brick veneer installations?
For masonry or concrete substrates, wall deflection is typically not a concern, since the substrate and veneer have similar stiffness. However, when installing thin brick over wood or steel stud framing, deflection must be carefully controlled due to the difference in stiffness between the veneer and the frame.
Code Guidelines:
- The International Building Code (IBC) limits stud wall deflection to L/240 when rigid finishes like thin brick are applied.
- For interior adhered veneer supported by wood floors, vertical floor deflection is limited to L/600.
- A more conservative L/360 limit is recommended to minimize cracking and prevent veneer separation when using stud framing.
- Proper structural design and framing practices are essential for ensuring a durable, long-lasting veneer installation, especially over flexible substrates.
Is a water-resistive barrier (WRB) and drainage system required behind thin brick veneer?
Yes. Both the International Residential Code (IRC) and the International Building Code (IBC) require exterior walls to include:
A water-resistive barrier (WRB)
A means of drainage behind the veneer, with limited exceptions
General Requirements:
WRB must be installed over sheathing or studs in framed wall assemblies
Assemblies tested to ASTM E331 for wind-driven rain resistance may also be exempt
Material Standards:
Acceptable WRB: One layer of No. 15 asphalt felt (ASTM D226, Type I) or other approved material
Over wood-based sheathing:
Use two layers of vapor-permeable WRB (equivalent to Grade D paper), or
A single high-performance WRB (60-minute Grade D equivalent) separated from the veneer by a drainage space or non-absorbent layer
Means of Drainage:
While code does not prescribe exact materials, products such as drainage mats are commonly used and preferred
Brick It’s MCS and CI systems incorporate designed drainage solutions that meet these requirements
WRBs are not required for interior applications, but may still be helpful in preventing moisture damage during installation.
For full compliance, consult your local building codes or refer to the IBC/IRC.
Can I order product samples before placing a full order?
Yes, sample boards are often sufficient for initial evaluation. However, for larger projects, we recommend building a field panel (also called a mock-up or field sample) to finalize product selection and set quality expectations. This freestanding panel, typically about 15 sq. ft., serves as the on-site reference standard for brick bond, mortar, workmanship, and appearance.
Use our [Material Calculator] to estimate the materials needed for constructing your panel. It's usually the responsibility of the general contractor and mason to maintain the field panel until final project approval.
Product samples can be ordered directly from each brick’s product page on our website. Mortar color samples are available under the “Mortar” tab. For custom requests, feel free to [contact us].
Brick Breakage & Waste Policy
Brick waste and chippage allowances are guided by ASTM standards, which typically permit 5–10% of a shipment to include chipped or broken bricks.
When estimating brick quantities:
Calculate the net number of bricks required.
Add at least 5% extra to account for breakage and waste during transport and installation.
Standard Allowance: +5–10%
Higher Waste Rate? Use more if your project involves complex cuts, tough site conditions, or rough handling.
Source: Brick Industry Association
Stone
Can I hang pictures, awnings, or attach fixtures to thin brick veneer?
Thin brick veneer is non-structural and not designed to support loads. We generally do not recommend fastening directly into the veneer. Instead, anchor fixtures to the underlying wall structure before applying the veneer.
Best Practices:
- Plan in advance: install backing or supports (e.g., blocking or junction boxes) behind the veneer during rough-in
- For items like sconces, it's acceptable to mount them on a junction box that is securely fastened to the wall
- Ensure all penetrations are properly sealed to maintain water-tightness
- For heavier items such as awnings or shelves, always consult a structural professional and coordinate mounting details before veneer installation.
How does wall deflection affect thin brick veneer installations?
For masonry or concrete substrates, wall deflection is typically not a concern, since the substrate and veneer have similar stiffness. However, when installing thin brick over wood or steel stud framing, deflection must be carefully controlled due to the difference in stiffness between the veneer and the frame.
Code Guidelines:
- The International Building Code (IBC) limits stud wall deflection to L/240 when rigid finishes like thin brick are applied.
- For interior adhered veneer supported by wood floors, vertical floor deflection is limited to L/600.
- A more conservative L/360 limit is recommended to minimize cracking and prevent veneer separation when using stud framing.
- Proper structural design and framing practices are essential for ensuring a durable, long-lasting veneer installation, especially over flexible substrates.
Is a water-resistive barrier (WRB) and drainage system required behind thin brick veneer?
Yes. Both the International Residential Code (IRC) and the International Building Code (IBC) require exterior walls to include:
A water-resistive barrier (WRB)
A means of drainage behind the veneer, with limited exceptions
General Requirements:
WRB must be installed over sheathing or studs in framed wall assemblies
Assemblies tested to ASTM E331 for wind-driven rain resistance may also be exempt
Material Standards:
Acceptable WRB: One layer of No. 15 asphalt felt (ASTM D226, Type I) or other approved material
Over wood-based sheathing:
Use two layers of vapor-permeable WRB (equivalent to Grade D paper), or
A single high-performance WRB (60-minute Grade D equivalent) separated from the veneer by a drainage space or non-absorbent layer
Means of Drainage:
While code does not prescribe exact materials, products such as drainage mats are commonly used and preferred
Brick It’s MCS and CI systems incorporate designed drainage solutions that meet these requirements
WRBs are not required for interior applications, but may still be helpful in preventing moisture damage during installation.
For full compliance, consult your local building codes or refer to the IBC/IRC.
What are the clearance requirements for installing thin brick veneer near grade or paving?
According to the International Residential Code (IRC) and International Building Code (IBC), exterior thin brick veneer over stud walls must maintain minimum clearances for durability and moisture protection:
- 4 inches (102 mm) above finished grade
- 2 inches (51 mm) above paved surfaces
- ½ inch (12 mm) above exterior walking surfaces supported by the same foundation
- Thin brick must also extend at least 1 inch (25 mm) below the top of the concrete or masonry foundation wall
These requirements help prevent moisture damage and ensure long-term performance. Always verify with local building codes or your project’s design professional for compliance.
Can I order product samples before placing a full order?
Yes, sample boards are often sufficient for initial evaluation. However, for larger projects, we recommend building a field panel (also called a mock-up or field sample) to finalize product selection and set quality expectations. This freestanding panel, typically about 15 sq. ft., serves as the on-site reference standard for brick bond, mortar, workmanship, and appearance.
Use our [Material Calculator] to estimate the materials needed for constructing your panel. It's usually the responsibility of the general contractor and mason to maintain the field panel until final project approval.
Product samples can be ordered directly from each brick’s product page on our website. Mortar color samples are available under the “Mortar” tab. For custom requests, feel free to [contact us].
Brick Breakage & Waste Policy
Brick waste and chippage allowances are guided by ASTM standards, which typically permit 5–10% of a shipment to include chipped or broken bricks.
When estimating brick quantities:
Calculate the net number of bricks required.
Add at least 5% extra to account for breakage and waste during transport and installation.
Standard Allowance: +5–10%
Higher Waste Rate? Use more if your project involves complex cuts, tough site conditions, or rough handling.
Source: Brick Industry Association
Stucco
Can I hang pictures, awnings, or attach fixtures to thin brick veneer?
Thin brick veneer is non-structural and not designed to support loads. We generally do not recommend fastening directly into the veneer. Instead, anchor fixtures to the underlying wall structure before applying the veneer.
Best Practices:
- Plan in advance: install backing or supports (e.g., blocking or junction boxes) behind the veneer during rough-in
- For items like sconces, it's acceptable to mount them on a junction box that is securely fastened to the wall
- Ensure all penetrations are properly sealed to maintain water-tightness
- For heavier items such as awnings or shelves, always consult a structural professional and coordinate mounting details before veneer installation.
How does wall deflection affect thin brick veneer installations?
For masonry or concrete substrates, wall deflection is typically not a concern, since the substrate and veneer have similar stiffness. However, when installing thin brick over wood or steel stud framing, deflection must be carefully controlled due to the difference in stiffness between the veneer and the frame.
Code Guidelines:
- The International Building Code (IBC) limits stud wall deflection to L/240 when rigid finishes like thin brick are applied.
- For interior adhered veneer supported by wood floors, vertical floor deflection is limited to L/600.
- A more conservative L/360 limit is recommended to minimize cracking and prevent veneer separation when using stud framing.
- Proper structural design and framing practices are essential for ensuring a durable, long-lasting veneer installation, especially over flexible substrates.
Is a water-resistive barrier (WRB) and drainage system required behind thin brick veneer?
Yes. Both the International Residential Code (IRC) and the International Building Code (IBC) require exterior walls to include:
A water-resistive barrier (WRB)
A means of drainage behind the veneer, with limited exceptions
General Requirements:
WRB must be installed over sheathing or studs in framed wall assemblies
Assemblies tested to ASTM E331 for wind-driven rain resistance may also be exempt
Material Standards:
Acceptable WRB: One layer of No. 15 asphalt felt (ASTM D226, Type I) or other approved material
Over wood-based sheathing:
Use two layers of vapor-permeable WRB (equivalent to Grade D paper), or
A single high-performance WRB (60-minute Grade D equivalent) separated from the veneer by a drainage space or non-absorbent layer
Means of Drainage:
While code does not prescribe exact materials, products such as drainage mats are commonly used and preferred
Brick It’s MCS and CI systems incorporate designed drainage solutions that meet these requirements
WRBs are not required for interior applications, but may still be helpful in preventing moisture damage during installation.
For full compliance, consult your local building codes or refer to the IBC/IRC.
What are the clearance requirements for installing thin brick veneer near grade or paving?
According to the International Residential Code (IRC) and International Building Code (IBC), exterior thin brick veneer over stud walls must maintain minimum clearances for durability and moisture protection:
- 4 inches (102 mm) above finished grade
- 2 inches (51 mm) above paved surfaces
- ½ inch (12 mm) above exterior walking surfaces supported by the same foundation
- Thin brick must also extend at least 1 inch (25 mm) below the top of the concrete or masonry foundation wall
These requirements help prevent moisture damage and ensure long-term performance. Always verify with local building codes or your project’s design professional for compliance.
Can I order product samples before placing a full order?
Yes, sample boards are often sufficient for initial evaluation. However, for larger projects, we recommend building a field panel (also called a mock-up or field sample) to finalize product selection and set quality expectations. This freestanding panel, typically about 15 sq. ft., serves as the on-site reference standard for brick bond, mortar, workmanship, and appearance.
Use our [Material Calculator] to estimate the materials needed for constructing your panel. It's usually the responsibility of the general contractor and mason to maintain the field panel until final project approval.
Product samples can be ordered directly from each brick’s product page on our website. Mortar color samples are available under the “Mortar” tab. For custom requests, feel free to [contact us].
Brick Breakage & Waste Policy
Brick waste and chippage allowances are guided by ASTM standards, which typically permit 5–10% of a shipment to include chipped or broken bricks.
When estimating brick quantities:
Calculate the net number of bricks required.
Add at least 5% extra to account for breakage and waste during transport and installation.
Standard Allowance: +5–10%
Higher Waste Rate? Use more if your project involves complex cuts, tough site conditions, or rough handling.
Source: Brick Industry Association
Designer Metal Grid System, DMG
What Thin Brick Sizes Are Available at Brick It?
Brick It offers thin brick in all standard industry sizes. The most popular is the Modular (MOD) size, with a face dimension of 2 1/4" x 7 5/8". Other sizes are also available to accommodate specific project requirements. When purchasing metal panel systems separately, it is important to confirm the brick height to ensure accurate panel compatibility.
I Was Installing Thin Brick and Now I Have Some Cement Smears on the Face. How Do I Clean It Off?
When installed cleanly and carefully, your thin brick veneer should require little to no cleaning. However, if you notice cement smears or residue, some bricks may benefit from a light rinse using a mild-strength cleaning solution.
Here are a few important tips:
- Always follow the cleaning product manufacturer’s instructions carefully.
- We offer several cleaning solutions that are compatible with thin brick surfaces.
- For more advanced guidance, we recommend visiting www.prosoco.com, a trusted industry leader in masonry cleaning products.
Important Caution:
Before applying any chemical cleaner to your actual project, test it on a sample panel or a small, inconspicuous area. Many cleaning products are irreversible and may affect the appearance of the brick if not used properly.
Why Should I Use the Brick It System for Thin Brick Installation?
Installing thin brick veneers requires more than just the brick itself; it requires a complete, well-engineered system. The Brick It System provides all the necessary components to ensure a proper, code-compliant installation, whether for interior or exterior use.
By purchasing all materials directly from Brick It, you benefit from:
- Convenience – Everything you need from one trusted source.
- Compatibility – Products designed to work together for optimal performance.
- Warranty Protection – A system-based warranty supported by a single manufacturer.
- Single Source of Responsibility – One point of contact for technical support, guidance, and accountability.
Choosing the Brick It System ensures peace of mind and a successful thin brick installation.
Which System Should I Use?
The right system depends on your project needs, but here is a quick overview to help you decide:
- Designer Metal Grid (DMG) System
This is our most popular solution. It is the easiest to install, cost-effective, and ideal for both professionals and DIY users. It’s a great choice for most interior and basic exterior applications.
- Moisture Control System (MCS)
If moisture management is a concern, especially for exterior walls, the MCS system offers built-in drainage features and enhanced protection against water intrusion.
- Continuous Insulation System (CI)
This system is ideal when your project requires added thermal performance. It integrates foam insulation and a structural fastening method to help meet modern energy codes while still supporting thin brick installation.
Each system serves a specific purpose, so consider your climate, wall assembly, and performance goals when choosing.
Can a Person with Limited Construction Experience Handle the Installation, Like a Typical Homeowner?
Absolutely. Our metal grid system is designed to be user-friendly and efficient, making it accessible even to those with little or no construction background. Over the years, we have seen many homeowners and individuals with varying skill levels complete their own installations with great success.
Those who take on the project themselves often enjoy a strong sense of pride and accomplishment, along with a finished product that looks professionally installed. By carefully following the instructions and taking your time, this can be a very rewarding experience.
I’m a Skilled Contractor, Why Should I Use Brick-It’s Panel System?
The Brick-It Panel System offers significant benefits even for experienced contractors by enhancing strength, ease of installation, and most importantly, speed.
For comparison:
- With conventional thin-set or thick-set methods, a skilled installer typically places 250 to 350 bricks per day.
- Using the Brick-It metal grid system, that number jumps to 1,100 to 1,400 bricks per day—a 3 to 5× productivity increase.
Much of this output can be achieved with just one mechanic, supported by a small team of helpers, making the system extremely cost-effective. Faster installation means lower labor costs, quicker project turnaround, and more jobs completed with the same crew.
In short, it helps skilled professionals work smarter and more profitably, without compromising quality.
Do You Have Brick it Installers in My Area?
Brick It does not offer installation services and does not employ installers. While we likely have customers who have purchased our systems in your area, we cannot verify or endorse their work, as we haven’t seen their completed projects and cannot speak to their quality or professionalism.
We recommend hiring a trusted local contractor with experience in one of the following trades:
- Stucco installation.
- Carpentry.
- Tile setting.
- Masonry.
- Or a qualified handyman.
Any skilled professional familiar with exterior finishes or panel systems should be able to install Brick It products successfully by following our provided installation guidelines.
What Type of Contractors Install Thin Brick?
The type of contractor best suited for your project will depend on its scope and setting. The following professionals are commonly capable of installing thin brick panel systems:
- Stucco Contractors
- Masons
- Carpenters
- Tile Setters
- Exterior Cladding or Façade Specialists – Particularly for commercial or large-scale exterior applications
- Landscapers, Plumbers, Electricians, and Painters – Often take on small-scale or interior installations
Regardless of trade, it’s important that the installer is detail-oriented, follows our installation guidelines, and is comfortable working with panel systems and masonry materials.
Can the Brick It Panel System Be Used with Other Manufacturers’ Brick?
Yes, the Brick It Panel System is compatible with other manufacturers’ thin brick, as long as the brick conforms to a standard U.S. size. The most important factor is the brick face height, which must match the panel spacing to ensure proper fit and alignment.
We recommend checking your brick dimensions and comparing them with our panel sizing chart before ordering.
How Heavy Is the DMG System With Brick and Mortar Combined?
The total weight of the installed DMG System, including thin brick and mortar, typically averages around 7 lbs per square foot. The exact weight may vary slightly depending on the brick type and thickness used in your project.
This lightweight nature makes the system suitable for a wide range of applications, including interior walls and retrofits.
What Are the Features of the DMG Panel System?
The DMG Panel System offers several key features that make installation faster, cleaner, and more reliable:
- Continuous Ledges: The roll-formed design provides continuous horizontal ledges, which add structural rigidity and support.
- Tongue-and-Groove Locking System: These interlocking edges make alignment simple and ensure consistent spacing between panels.
- Adhesive Holes: A linear pattern of perforated holes allows adhesive to bridge through the panel, helping to counteract oil canning, a common issue with sheet metal.
- Mortar Lock Punch-Outs: Strategically placed openings allow mortar to key into the panel, improving bond strength and stability.
- Precision Brick Alignment: The system ensures proper brick spacing and alignment every time, reducing layout errors and speeding up installation.
Is the DMG Panel System Designed for Interior or Exterior Use?
The DMG Panel System is primarily the system of choice for interior applications, thanks to its ease of use and clean finish. However, it can also be used on exterior walls when properly installed over suitable substrates and moisture barriers.
That said, for exterior installations, we typically recommend our MCS Panel System, which includes enhanced moisture management features specifically designed for outdoor environments.
How Do I Fasten the Panel to the Wall?
Fastening the panel correctly is essential for a secure and aligned installation. Follow these key guidelines:
- The metal grid features an interlocking top and bottom edge to help maintain level placement.
- Always check the level periodically after installing several rows.
- Panels should be installed so the brick extends 1/2” past the grid at the ends.
- Notch and bend the panel as needed to wrap around outside corners.
- Use one fastener per brick row every 16” horizontally (aligned with studs or structural substrate).
Can the DMG System Be Installed Directly Over Drywall?
Yes, the DMG System panels can be installed over drywall, but the fasteners must penetrate directly into the studs behind the drywall. Drywall alone does not have the structural capacity to support the system.
Always ensure fasteners are properly aligned with the framing members to provide a secure and code-compliant installation.
Is the Brick It Panel System Approved for Use in Miami-Dade County, Florida?
Yes. The Brick It Panel System is approved in Miami-Dade County under the 2014 Florida Building Code. While this code version is still accepted, Brick It is actively working on obtaining updated approvals under newer code versions.
To locate the official approval:
- Visit the Florida DBPR Product Approval Search.
- Under "Code Version," select 2014.
- In the "FL# (Product Approval Number)" field, enter: 14427
- Click Search to view approval details.
We will update our documentation once the new approvals are finalized.
How Do I Install Thin Brick Using Brick it Panel System?
Installing bricks with our panel system is simple, efficient, and designed for clean, consistent results. Follow these basic steps:
- Apply Adhesive:
Apply Brick It adhesive to the back of each brick either in vertical lines or in quarter-sized dabs.
- Test Layout:
Begin by installing one row of bricks to check alignment and layout.
- Start with Corners:
Always start with a corner brick—or with corner bricks at both ends of the wall, if applicable.
- Brick Placement:
- For straight walls with no corners, install bricks following the direction of the arrows on the panel.
- Adjust vertical joints as needed (between 3/8" and 1/2") to fit the wall area.
- Cut end bricks to size where necessary.
- Work Horizontally First:
Install horizontal rows first, followed by vertical joints.
- Use Alignment Marks:
Draw a vertical plumb line every 48" to help maintain consistent spacing and alignment.
More information here.
What Is the Size of Brick it Metal Panels?
Our metal grid panels are designed to hold three courses of brick, which means the panel height will vary based on the brick face height. Panels are available in two standard lengths: 48" and 96".
- 48" panels are the most commonly used due to their ease of handling, transport, and installation.
- 96" panels are available by special order, but are more challenging to ship and do not necessarily speed up installation.
For more sizing information, please visit the product page by clicking here.
What Tools Are Required to Install Thin Brick?
Most thin brick installations require only basic masonry and tile tools, such as a trowel, mortar bag, level, jointing tool, and a saw or splitter for cutting bricks.
To make things even easier, our System Configurator displays the recommended tools for each specific step of your installation, based on your selected wall assembly and system components. We encourage you to use the configurator when quoting your project to ensure you have everything you need, including the correct tools and accessories.
What Do I Use to Fasten the Metal Grid Panel to the Wall?
We recommend using non-corrosive, preferably ribbed fasteners that provide sufficient penetration to securely anchor the metal grid panel to the substrate. The correct type of fastener will depend on the wall material (e.g., wood, steel, concrete, or masonry) and the specific system being installed.
Using the right fasteners is critical to ensure the long-term performance and stability of your thin brick installation.
You can view our recommended fasteners and purchase options by clicking here.
How Do I Point or Grout Thin Brick?
Follow these steps to properly mix and apply mortar for thin brick joints:
- Mixing the Mortar:
- Empty the entire contents of the 40 lb Brick It mortar mix into a 5-gallon bucket.
- If you've ordered a colored mortar, add the full contents of the accompanying 1.5 lb colorant pack to the same bucket.
- Slowly add clean, cold water while mixing with a 1/2" drill and mortar paddle at low speed (450–550 RPM) until the mixture reaches a smooth, workable consistency.
- The mortar is properly mixed when it flows easily from a mortar bag.
- Application:
- Load the mortar into a mortar bag and apply it to the horizontal joints first, followed by the vertical joints.
- Always overfill joints slightly to ensure there are no air pockets or voids.
- Tooling the Joints:
- Begin checking mortar firmness every 3–5 minutes. Once it reaches a firm but workable consistency, it's ready for tooling.
- Use the joint tool provided in your kit to strike the vertical joints first, then the horizontal ones.
- Hold the tool at a 45° angle and strike the joint to compress and seal the mortar against the brick edges.
- Maintain no more than 1/8” recess from the brick face for proper finish.
- The result will be a concave joint finish. Fill any visible voids as needed.
- Temperature Warning:
- Do not apply mortar when daytime or nighttime temperatures are expected to fall below 40°F, as this can compromise the curing process.
Can I Use a Sponge to Finish the Joints Like a Tile Installer Would?
We do not recommend using a sponge-finish technique for brick joints, as it is commonly done with tile. Unlike glazed tile, most brick surfaces are porous and textured, making it difficult to clean mortar off the face without leaving permanent stains or residue.
That said, if a slightly smeared or weathered appearance is part of your intended aesthetic, this technique might help achieve that look. In any case, we strongly advise testing your method on a sample panel before applying it to the main wall.
Brick it Quick Installation Tips
- Secure Anchoring: Always anchor the metal grid securely to the substrate using appropriate fasteners. For concrete and masonry walls, use both mechanical fasteners and adhesive on the back of the grid for proper adhesion.
- Waterproof Protection: Apply a waterproof membrane or approved weather barrier over all exterior substrates before installing the grid system.
- Panel Spacing:
- Stagger vertical joints of the grid for better structural integrity.
- Leave a minimum 1/8" gap between panel joints.
- Stop the metal panel 1/2" short of edges and terminations to allow for movement and finish detailing.
- Adhesive Cure Time: Allow at least 24 hours for the adhesive to cure before proceeding with mortaring.
- Mortar Mixing:
- Use only clean, cold water, especially in warm weather.
- Always flush hoses before use to remove any contaminants.
- Brick Preparation:
- Slightly dampen bricks before applying mortar, particularly during hot or dry conditions, to prevent premature moisture loss from the mortar.
What’s the Purpose of the Drainage Mat?
The drainage mat plays a critical role in managing moisture behind thin brick veneer. Made from high-impact materials, it allows for the rapid exit of water that brick naturally absorbs, promoting continuous airflow between the veneer and the structural wall. This helps prevent moisture buildup, mold, and long-term damage to the building envelope.
Which Moisture Barrier Should I Use?
Although we are not a manufacturer of moisture barriers and cannot recommend a specific brand, we can provide some general guidance based on industry standards. Most professionals now recommend using two layers of moisture protection behind thin brick veneer. This can include:
- Two layers of building paper.
- A combination of one roll-on applied membrane and one sheet-applied layer.
- Pre-bonded 2-ply papers, which unroll together for easier installation.
It’s important to note that brick and mortar are not waterproof—your moisture barrier is the critical line of defense against water intrusion. For this reason, we strongly advise consulting your project architect or building envelope consultant to select the appropriate system.
For moisture control accessories offered through Brick It, click here.
Why Do the Panels Have Rectangular Holes and What Are They For?
The rectangular holes in our panels serve two important functions:
- Water Drainage – Certain holes are specifically designed to allow moisture to escape from behind the brick veneer, helping to prevent water accumulation and potential damage.
- Oil Canning Control – Other holes are strategically placed to help bridge and minimize oil canning, a visual distortion that can occur in flat metal surfaces.
During product development and testing, we discovered that round holes are less effective at drainage, as water tends to flow around them, especially when punched from the back, which creates a subtle burr that deflects water. To address this, we intentionally designed rectangular holes and adjusted the punch direction, improving both drainage and performance.
Do You Have Instructions on How to Install the System?
Yes. We offer a detailed three-part installation video on our YouTube channel. While the video may feel a bit long or dated, it remains a valuable resource. It features Brick-It’s original inventor, who shares the installation process with genuine passion and first-hand insight.
Though we’ve considered updating it, we’ve chosen to keep it live for both sentimental value and its instructional clarity. We encourage you to watch—it’s time well spent.
Part #1 is attached, and for parts two & three, click here.
How Does the Metal Grid System 〈DMD or MCS〉 Compare to Conventional Installation Methods?
Conventional thin brick installation systems are generally slower and more labor-intensive. On average, a skilled installer using a conventional system can set approximately 250 bricks per day. In contrast, the same installer can install around 1,200 bricks per day using one of our metal panel systems (DMD or MCS), making them significantly more efficient.
Thin-set systems are sometimes used for small interior applications—such as kitchen backsplashes or concrete stoops—typically up to 100 square feet in size. Thick-set systems, while slightly lower in material cost, require extensive labor and are rarely used due to their higher total project cost.
Our metal grid systems offer a modern, cost-effective, and time-saving alternative to traditional methods—ideal for both commercial and residential applications.
How Far Will the Brick Project Off the Existing Wall Using the DMG System?
The DMG (Designer Metal Grid) system uses a metal panel that is exceptionally thin—approximately 0.016"—and does not meaningfully contribute to the total system thickness. In most cases, the overall projection is determined solely by the thickness of the brick itself.
You can find exact brick dimensions on each product page under the Shapes & Sizes tab.
How Do Thermal Panel Movements Affect Installation?
When installing thin brick panel systems, it is important to allow for thermal expansion and contraction by leaving approximately a 1/4" gap between panels. Based on over 30 years of industry experience, we have not observed issues related to thermal movement when panels are installed correctly. For additional flexibility, we recommend using our hybrid thin brick adhesive. Once cured, it remains permanently flexible and does not harden, accommodating slight movements without compromising bond integrity.
Can I hang pictures, awnings, or attach fixtures to thin brick veneer?
Thin brick veneer is non-structural and not designed to support loads. We generally do not recommend fastening directly into the veneer. Instead, anchor fixtures to the underlying wall structure before applying the veneer.
Best Practices:
- Plan in advance: install backing or supports (e.g., blocking or junction boxes) behind the veneer during rough-in
- For items like sconces, it's acceptable to mount them on a junction box that is securely fastened to the wall
- Ensure all penetrations are properly sealed to maintain water-tightness
- For heavier items such as awnings or shelves, always consult a structural professional and coordinate mounting details before veneer installation.
How does wall deflection affect thin brick veneer installations?
For masonry or concrete substrates, wall deflection is typically not a concern, since the substrate and veneer have similar stiffness. However, when installing thin brick over wood or steel stud framing, deflection must be carefully controlled due to the difference in stiffness between the veneer and the frame.
Code Guidelines:
- The International Building Code (IBC) limits stud wall deflection to L/240 when rigid finishes like thin brick are applied.
- For interior adhered veneer supported by wood floors, vertical floor deflection is limited to L/600.
- A more conservative L/360 limit is recommended to minimize cracking and prevent veneer separation when using stud framing.
- Proper structural design and framing practices are essential for ensuring a durable, long-lasting veneer installation, especially over flexible substrates.
Is a water-resistive barrier (WRB) and drainage system required behind thin brick veneer?
Yes. Both the International Residential Code (IRC) and the International Building Code (IBC) require exterior walls to include:
A water-resistive barrier (WRB)
A means of drainage behind the veneer, with limited exceptions
General Requirements:
WRB must be installed over sheathing or studs in framed wall assemblies
Assemblies tested to ASTM E331 for wind-driven rain resistance may also be exempt
Material Standards:
Acceptable WRB: One layer of No. 15 asphalt felt (ASTM D226, Type I) or other approved material
Over wood-based sheathing:
Use two layers of vapor-permeable WRB (equivalent to Grade D paper), or
A single high-performance WRB (60-minute Grade D equivalent) separated from the veneer by a drainage space or non-absorbent layer
Means of Drainage:
While code does not prescribe exact materials, products such as drainage mats are commonly used and preferred
Brick It’s MCS and CI systems incorporate designed drainage solutions that meet these requirements
WRBs are not required for interior applications, but may still be helpful in preventing moisture damage during installation.
For full compliance, consult your local building codes or refer to the IBC/IRC.
Where and how should flashing and weep screeds be installed in thin brick veneer systems?
Flashing collects moisture that enters the veneer system and channels it out through weeps. Building codes mandate flashing and weep locations to ensure proper drainage and prevent moisture damage.
Required Locations:
- Below the first course, above the final grade (IRC requires flashing or weep screed to extend 1 in. [25 mm] below the foundation plate over stud walls)
- At points of support like shelf angles, lintels, and structural floors
- At wall/roof intersections
- Around all window and door openings (head, jambs, and sills)
- Where masonry meets frame/stucco walls (e.g., chimneys)
- Under copings, sills, and terminations
- Where decks, porches, or stairs connect to framed walls
Installation Details: - The first brick course should sit directly above flashing or screed, without a mortar joint, to facilitate drainage
- Flashing must extend to or beyond the wall face, with the back flange turned up ≥ 3½ in. (89 mm)
- The water-resistive barrier (WRB) should lap over the flashing
- In two-layer WRB assemblies over wood sheathing, flashing should be placed between the layers
- A drip edge or weep screed is recommended if flashing is UV-sensitive
- Without a drip edge, flashing should be cut flush with the wall face
What are the clearance requirements for installing thin brick veneer near grade or paving?
According to the International Residential Code (IRC) and International Building Code (IBC), exterior thin brick veneer over stud walls must maintain minimum clearances for durability and moisture protection:
- 4 inches (102 mm) above finished grade
- 2 inches (51 mm) above paved surfaces
- ½ inch (12 mm) above exterior walking surfaces supported by the same foundation
- Thin brick must also extend at least 1 inch (25 mm) below the top of the concrete or masonry foundation wall
These requirements help prevent moisture damage and ensure long-term performance. Always verify with local building codes or your project’s design professional for compliance.
Why are movement joints important in thin brick veneer systems?
Thin brick veneers can experience differential movement as bricks expand and substrates shrink. To avoid cracking or system failure, properly placed movement joints are critical. These joints allow for natural expansion, contraction, and structural movement.
Placement Guidelines:
- Maximum spacing: 18 feet (5.5 m) vertically or horizontally
- Maximum area between joints: 144 sq. ft. (13.4 m²)
- Preferably square zones with a maximum 2½:1 length-to-height ratio
- Align joints with substrate joints when applied over concrete or masonry
- On framed walls, veneer joints don’t need to align with sheathing joints
Construction Notes: - Joints must extend fully through the veneer to the substrate
- Use a compressible filler during mortar placement to keep joints clear
- Apply backer rod and sealant at the surface to block moisture
- Minimum joint width: ⅜ inch (10 mm)
- Mesh or lath reinforcement should stop at joints and not bridge across
Proper movement joint design and execution are essential for system longevity and should follow project-specific architectural and engineering requirements.
Can the system be used to span between a plywood substrate and a concrete foundation?
Technically, installations over plywood and concrete should be treated as two separate systems, divided by a properly placed caulk joint to allow for differential movement. In residential or smaller-scale applications, some customers choose to take an educated risk by treating the area as a single installation — omitting the caulk joint for aesthetic reasons. While this approach is common, it is done at the customer’s discretion. Please note that Brick It cannot assume responsibility for any resulting issues, even though the risk of failure may be minimal.
Curved Wall
To achieve a curved wall, various brick patterns may be used.
A running bond is a common starting point, but if the layout appears too "choppy," switching to a header or soldier course may provide a smoother appearance. The choice ultimately depends on the designer's intent and aesthetic preference.
Determining the minimum achievable radius depends on the brick size and selected pattern. As a general guideline, shorter bricks allow for tighter curves. For greater accuracy and visualization, designers and architects are encouraged to model the wall in CAD using actual brick and curve dimensions.
Moisture Control System, MCS
What Thin Brick Sizes Are Available at Brick It?
Brick It offers thin brick in all standard industry sizes. The most popular is the Modular (MOD) size, with a face dimension of 2 1/4" x 7 5/8". Other sizes are also available to accommodate specific project requirements. When purchasing metal panel systems separately, it is important to confirm the brick height to ensure accurate panel compatibility.
I Was Installing Thin Brick and Now I Have Some Cement Smears on the Face. How Do I Clean It Off?
When installed cleanly and carefully, your thin brick veneer should require little to no cleaning. However, if you notice cement smears or residue, some bricks may benefit from a light rinse using a mild-strength cleaning solution.
Here are a few important tips:
- Always follow the cleaning product manufacturer’s instructions carefully.
- We offer several cleaning solutions that are compatible with thin brick surfaces.
- For more advanced guidance, we recommend visiting www.prosoco.com, a trusted industry leader in masonry cleaning products.
Important Caution:
Before applying any chemical cleaner to your actual project, test it on a sample panel or a small, inconspicuous area. Many cleaning products are irreversible and may affect the appearance of the brick if not used properly.
Why Should I Use the Brick It System for Thin Brick Installation?
Installing thin brick veneers requires more than just the brick itself; it requires a complete, well-engineered system. The Brick It System provides all the necessary components to ensure a proper, code-compliant installation, whether for interior or exterior use.
By purchasing all materials directly from Brick It, you benefit from:
- Convenience – Everything you need from one trusted source.
- Compatibility – Products designed to work together for optimal performance.
- Warranty Protection – A system-based warranty supported by a single manufacturer.
- Single Source of Responsibility – One point of contact for technical support, guidance, and accountability.
Choosing the Brick It System ensures peace of mind and a successful thin brick installation.
Which System Should I Use?
The right system depends on your project needs, but here is a quick overview to help you decide:
- Designer Metal Grid (DMG) System
This is our most popular solution. It is the easiest to install, cost-effective, and ideal for both professionals and DIY users. It’s a great choice for most interior and basic exterior applications.
- Moisture Control System (MCS)
If moisture management is a concern, especially for exterior walls, the MCS system offers built-in drainage features and enhanced protection against water intrusion.
- Continuous Insulation System (CI)
This system is ideal when your project requires added thermal performance. It integrates foam insulation and a structural fastening method to help meet modern energy codes while still supporting thin brick installation.
Each system serves a specific purpose, so consider your climate, wall assembly, and performance goals when choosing.
Can a Person with Limited Construction Experience Handle the Installation, Like a Typical Homeowner?
Absolutely. Our metal grid system is designed to be user-friendly and efficient, making it accessible even to those with little or no construction background. Over the years, we have seen many homeowners and individuals with varying skill levels complete their own installations with great success.
Those who take on the project themselves often enjoy a strong sense of pride and accomplishment, along with a finished product that looks professionally installed. By carefully following the instructions and taking your time, this can be a very rewarding experience.
I’m a Skilled Contractor, Why Should I Use Brick-It’s Panel System?
The Brick-It Panel System offers significant benefits even for experienced contractors by enhancing strength, ease of installation, and most importantly, speed.
For comparison:
- With conventional thin-set or thick-set methods, a skilled installer typically places 250 to 350 bricks per day.
- Using the Brick-It metal grid system, that number jumps to 1,100 to 1,400 bricks per day—a 3 to 5× productivity increase.
Much of this output can be achieved with just one mechanic, supported by a small team of helpers, making the system extremely cost-effective. Faster installation means lower labor costs, quicker project turnaround, and more jobs completed with the same crew.
In short, it helps skilled professionals work smarter and more profitably, without compromising quality.
Do You Have Brick it Installers in My Area?
Brick It does not offer installation services and does not employ installers. While we likely have customers who have purchased our systems in your area, we cannot verify or endorse their work, as we haven’t seen their completed projects and cannot speak to their quality or professionalism.
We recommend hiring a trusted local contractor with experience in one of the following trades:
- Stucco installation.
- Carpentry.
- Tile setting.
- Masonry.
- Or a qualified handyman.
Any skilled professional familiar with exterior finishes or panel systems should be able to install Brick It products successfully by following our provided installation guidelines.
What Type of Contractors Install Thin Brick?
The type of contractor best suited for your project will depend on its scope and setting. The following professionals are commonly capable of installing thin brick panel systems:
- Stucco Contractors
- Masons
- Carpenters
- Tile Setters
- Exterior Cladding or Façade Specialists – Particularly for commercial or large-scale exterior applications
- Landscapers, Plumbers, Electricians, and Painters – Often take on small-scale or interior installations
Regardless of trade, it’s important that the installer is detail-oriented, follows our installation guidelines, and is comfortable working with panel systems and masonry materials.
Can the Brick It Panel System Be Used with Other Manufacturers’ Brick?
Yes, the Brick It Panel System is compatible with other manufacturers’ thin brick, as long as the brick conforms to a standard U.S. size. The most important factor is the brick face height, which must match the panel spacing to ensure proper fit and alignment.
We recommend checking your brick dimensions and comparing them with our panel sizing chart before ordering.
How Do I Fasten the Panel to the Wall?
Fastening the panel correctly is essential for a secure and aligned installation. Follow these key guidelines:
- The metal grid features an interlocking top and bottom edge to help maintain level placement.
- Always check the level periodically after installing several rows.
- Panels should be installed so the brick extends 1/2” past the grid at the ends.
- Notch and bend the panel as needed to wrap around outside corners.
- Use one fastener per brick row every 16” horizontally (aligned with studs or structural substrate).
Is the Brick It Panel System Approved for Use in Miami-Dade County, Florida?
Yes. The Brick It Panel System is approved in Miami-Dade County under the 2014 Florida Building Code. While this code version is still accepted, Brick It is actively working on obtaining updated approvals under newer code versions.
To locate the official approval:
- Visit the Florida DBPR Product Approval Search.
- Under "Code Version," select 2014.
- In the "FL# (Product Approval Number)" field, enter: 14427
- Click Search to view approval details.
We will update our documentation once the new approvals are finalized.
How Do I Install Thin Brick Using Brick it Panel System?
Installing bricks with our panel system is simple, efficient, and designed for clean, consistent results. Follow these basic steps:
- Apply Adhesive:
Apply Brick It adhesive to the back of each brick either in vertical lines or in quarter-sized dabs.
- Test Layout:
Begin by installing one row of bricks to check alignment and layout.
- Start with Corners:
Always start with a corner brick—or with corner bricks at both ends of the wall, if applicable.
- Brick Placement:
- For straight walls with no corners, install bricks following the direction of the arrows on the panel.
- Adjust vertical joints as needed (between 3/8" and 1/2") to fit the wall area.
- Cut end bricks to size where necessary.
- Work Horizontally First:
Install horizontal rows first, followed by vertical joints.
- Use Alignment Marks:
Draw a vertical plumb line every 48" to help maintain consistent spacing and alignment.
More information here.
What Is the Size of Brick it Metal Panels?
Our metal grid panels are designed to hold three courses of brick, which means the panel height will vary based on the brick face height. Panels are available in two standard lengths: 48" and 96".
- 48" panels are the most commonly used due to their ease of handling, transport, and installation.
- 96" panels are available by special order, but are more challenging to ship and do not necessarily speed up installation.
For more sizing information, please visit the product page by clicking here.
What Tools Are Required to Install Thin Brick?
Most thin brick installations require only basic masonry and tile tools, such as a trowel, mortar bag, level, jointing tool, and a saw or splitter for cutting bricks.
To make things even easier, our System Configurator displays the recommended tools for each specific step of your installation, based on your selected wall assembly and system components. We encourage you to use the configurator when quoting your project to ensure you have everything you need, including the correct tools and accessories.
What Do I Use to Fasten the Metal Grid Panel to the Wall?
We recommend using non-corrosive, preferably ribbed fasteners that provide sufficient penetration to securely anchor the metal grid panel to the substrate. The correct type of fastener will depend on the wall material (e.g., wood, steel, concrete, or masonry) and the specific system being installed.
Using the right fasteners is critical to ensure the long-term performance and stability of your thin brick installation.
You can view our recommended fasteners and purchase options by clicking here.
How Do I Point or Grout Thin Brick?
Follow these steps to properly mix and apply mortar for thin brick joints:
- Mixing the Mortar:
- Empty the entire contents of the 40 lb Brick It mortar mix into a 5-gallon bucket.
- If you've ordered a colored mortar, add the full contents of the accompanying 1.5 lb colorant pack to the same bucket.
- Slowly add clean, cold water while mixing with a 1/2" drill and mortar paddle at low speed (450–550 RPM) until the mixture reaches a smooth, workable consistency.
- The mortar is properly mixed when it flows easily from a mortar bag.
- Application:
- Load the mortar into a mortar bag and apply it to the horizontal joints first, followed by the vertical joints.
- Always overfill joints slightly to ensure there are no air pockets or voids.
- Tooling the Joints:
- Begin checking mortar firmness every 3–5 minutes. Once it reaches a firm but workable consistency, it's ready for tooling.
- Use the joint tool provided in your kit to strike the vertical joints first, then the horizontal ones.
- Hold the tool at a 45° angle and strike the joint to compress and seal the mortar against the brick edges.
- Maintain no more than 1/8” recess from the brick face for proper finish.
- The result will be a concave joint finish. Fill any visible voids as needed.
- Temperature Warning:
- Do not apply mortar when daytime or nighttime temperatures are expected to fall below 40°F, as this can compromise the curing process.
Can I Use a Sponge to Finish the Joints Like a Tile Installer Would?
We do not recommend using a sponge-finish technique for brick joints, as it is commonly done with tile. Unlike glazed tile, most brick surfaces are porous and textured, making it difficult to clean mortar off the face without leaving permanent stains or residue.
That said, if a slightly smeared or weathered appearance is part of your intended aesthetic, this technique might help achieve that look. In any case, we strongly advise testing your method on a sample panel before applying it to the main wall.
Brick it Quick Installation Tips
- Secure Anchoring: Always anchor the metal grid securely to the substrate using appropriate fasteners. For concrete and masonry walls, use both mechanical fasteners and adhesive on the back of the grid for proper adhesion.
- Waterproof Protection: Apply a waterproof membrane or approved weather barrier over all exterior substrates before installing the grid system.
- Panel Spacing:
- Stagger vertical joints of the grid for better structural integrity.
- Leave a minimum 1/8" gap between panel joints.
- Stop the metal panel 1/2" short of edges and terminations to allow for movement and finish detailing.
- Adhesive Cure Time: Allow at least 24 hours for the adhesive to cure before proceeding with mortaring.
- Mortar Mixing:
- Use only clean, cold water, especially in warm weather.
- Always flush hoses before use to remove any contaminants.
- Brick Preparation:
- Slightly dampen bricks before applying mortar, particularly during hot or dry conditions, to prevent premature moisture loss from the mortar.
What’s the Purpose of the Drainage Mat?
The drainage mat plays a critical role in managing moisture behind thin brick veneer. Made from high-impact materials, it allows for the rapid exit of water that brick naturally absorbs, promoting continuous airflow between the veneer and the structural wall. This helps prevent moisture buildup, mold, and long-term damage to the building envelope.
What Is the Moisture Control System 〈MCS〉?
The Moisture Control System (MCS) combines all the features of our Metal Grid System with integrated moisture management capabilities. Its patented design (U.S. Patent #8,141,310) actively redirects water from the front of the panel to the back every 8 inches using strategically placed offset weep holes.
This approach helps protect the wall assembly by promoting drainage and ventilation behind the brick veneer, making it the only patented moisture control system specifically designed for thin brick installation.
Is the Moisture Control System 〈MCS〉 More Expensive Than the DMG System?
Yes, the MCS System is slightly more expensive than the DMG System. This is due to its additional components, such as the integrated drainage mat, and the use of a higher-grade galvanized coating for enhanced durability and moisture management.
Think of it as an insurance policy for your wall assembly, an added layer of protection that may be well worth the investment, depending on your project's exposure and performance goals. The best way to evaluate the cost difference is to request a quote and compare the full system pricing. Ultimately, the choice is yours.
Which Moisture Barrier Should I Use?
Although we are not a manufacturer of moisture barriers and cannot recommend a specific brand, we can provide some general guidance based on industry standards. Most professionals now recommend using two layers of moisture protection behind thin brick veneer. This can include:
- Two layers of building paper.
- A combination of one roll-on applied membrane and one sheet-applied layer.
- Pre-bonded 2-ply papers, which unroll together for easier installation.
It’s important to note that brick and mortar are not waterproof—your moisture barrier is the critical line of defense against water intrusion. For this reason, we strongly advise consulting your project architect or building envelope consultant to select the appropriate system.
For moisture control accessories offered through Brick It, click here.
Why Do the Panels Have Rectangular Holes and What Are They For?
The rectangular holes in our panels serve two important functions:
- Water Drainage – Certain holes are specifically designed to allow moisture to escape from behind the brick veneer, helping to prevent water accumulation and potential damage.
- Oil Canning Control – Other holes are strategically placed to help bridge and minimize oil canning, a visual distortion that can occur in flat metal surfaces.
During product development and testing, we discovered that round holes are less effective at drainage, as water tends to flow around them, especially when punched from the back, which creates a subtle burr that deflects water. To address this, we intentionally designed rectangular holes and adjusted the punch direction, improving both drainage and performance.
How Does the Metal Grid System 〈DMD or MCS〉 Compare to Conventional Installation Methods?
Conventional thin brick installation systems are generally slower and more labor-intensive. On average, a skilled installer using a conventional system can set approximately 250 bricks per day. In contrast, the same installer can install around 1,200 bricks per day using one of our metal panel systems (DMD or MCS), making them significantly more efficient.
Thin-set systems are sometimes used for small interior applications—such as kitchen backsplashes or concrete stoops—typically up to 100 square feet in size. Thick-set systems, while slightly lower in material cost, require extensive labor and are rarely used due to their higher total project cost.
Our metal grid systems offer a modern, cost-effective, and time-saving alternative to traditional methods—ideal for both commercial and residential applications.
How Far Will the Brick Project Off the Existing Wall Using the MCS System?
The MCS (Moisture Control System) panel is extremely thin—approximately 0.016"—and does not significantly affect the overall system thickness. To calculate the total projection from the existing wall, simply add the thickness of the brick and the drainage mat.
Brick dimensions can be found on each product page under the Shapes & Sizes tab. The combined thickness of these components will give you an accurate estimate of how far the system will extend off the wall.
How Do Thermal Panel Movements Affect Installation?
When installing thin brick panel systems, it is important to allow for thermal expansion and contraction by leaving approximately a 1/4" gap between panels. Based on over 30 years of industry experience, we have not observed issues related to thermal movement when panels are installed correctly. For additional flexibility, we recommend using our hybrid thin brick adhesive. Once cured, it remains permanently flexible and does not harden, accommodating slight movements without compromising bond integrity.
Can I hang pictures, awnings, or attach fixtures to thin brick veneer?
Thin brick veneer is non-structural and not designed to support loads. We generally do not recommend fastening directly into the veneer. Instead, anchor fixtures to the underlying wall structure before applying the veneer.
Best Practices:
- Plan in advance: install backing or supports (e.g., blocking or junction boxes) behind the veneer during rough-in
- For items like sconces, it's acceptable to mount them on a junction box that is securely fastened to the wall
- Ensure all penetrations are properly sealed to maintain water-tightness
- For heavier items such as awnings or shelves, always consult a structural professional and coordinate mounting details before veneer installation.
How does wall deflection affect thin brick veneer installations?
For masonry or concrete substrates, wall deflection is typically not a concern, since the substrate and veneer have similar stiffness. However, when installing thin brick over wood or steel stud framing, deflection must be carefully controlled due to the difference in stiffness between the veneer and the frame.
Code Guidelines:
- The International Building Code (IBC) limits stud wall deflection to L/240 when rigid finishes like thin brick are applied.
- For interior adhered veneer supported by wood floors, vertical floor deflection is limited to L/600.
- A more conservative L/360 limit is recommended to minimize cracking and prevent veneer separation when using stud framing.
- Proper structural design and framing practices are essential for ensuring a durable, long-lasting veneer installation, especially over flexible substrates.
Is a water-resistive barrier (WRB) and drainage system required behind thin brick veneer?
Yes. Both the International Residential Code (IRC) and the International Building Code (IBC) require exterior walls to include:
A water-resistive barrier (WRB)
A means of drainage behind the veneer, with limited exceptions
General Requirements:
WRB must be installed over sheathing or studs in framed wall assemblies
Assemblies tested to ASTM E331 for wind-driven rain resistance may also be exempt
Material Standards:
Acceptable WRB: One layer of No. 15 asphalt felt (ASTM D226, Type I) or other approved material
Over wood-based sheathing:
Use two layers of vapor-permeable WRB (equivalent to Grade D paper), or
A single high-performance WRB (60-minute Grade D equivalent) separated from the veneer by a drainage space or non-absorbent layer
Means of Drainage:
While code does not prescribe exact materials, products such as drainage mats are commonly used and preferred
Brick It’s MCS and CI systems incorporate designed drainage solutions that meet these requirements
WRBs are not required for interior applications, but may still be helpful in preventing moisture damage during installation.
For full compliance, consult your local building codes or refer to the IBC/IRC.
Where and how should flashing and weep screeds be installed in thin brick veneer systems?
Flashing collects moisture that enters the veneer system and channels it out through weeps. Building codes mandate flashing and weep locations to ensure proper drainage and prevent moisture damage.
Required Locations:
- Below the first course, above the final grade (IRC requires flashing or weep screed to extend 1 in. [25 mm] below the foundation plate over stud walls)
- At points of support like shelf angles, lintels, and structural floors
- At wall/roof intersections
- Around all window and door openings (head, jambs, and sills)
- Where masonry meets frame/stucco walls (e.g., chimneys)
- Under copings, sills, and terminations
- Where decks, porches, or stairs connect to framed walls
Installation Details: - The first brick course should sit directly above flashing or screed, without a mortar joint, to facilitate drainage
- Flashing must extend to or beyond the wall face, with the back flange turned up ≥ 3½ in. (89 mm)
- The water-resistive barrier (WRB) should lap over the flashing
- In two-layer WRB assemblies over wood sheathing, flashing should be placed between the layers
- A drip edge or weep screed is recommended if flashing is UV-sensitive
- Without a drip edge, flashing should be cut flush with the wall face
What are the clearance requirements for installing thin brick veneer near grade or paving?
According to the International Residential Code (IRC) and International Building Code (IBC), exterior thin brick veneer over stud walls must maintain minimum clearances for durability and moisture protection:
- 4 inches (102 mm) above finished grade
- 2 inches (51 mm) above paved surfaces
- ½ inch (12 mm) above exterior walking surfaces supported by the same foundation
- Thin brick must also extend at least 1 inch (25 mm) below the top of the concrete or masonry foundation wall
These requirements help prevent moisture damage and ensure long-term performance. Always verify with local building codes or your project’s design professional for compliance.
Why are movement joints important in thin brick veneer systems?
Thin brick veneers can experience differential movement as bricks expand and substrates shrink. To avoid cracking or system failure, properly placed movement joints are critical. These joints allow for natural expansion, contraction, and structural movement.
Placement Guidelines:
- Maximum spacing: 18 feet (5.5 m) vertically or horizontally
- Maximum area between joints: 144 sq. ft. (13.4 m²)
- Preferably square zones with a maximum 2½:1 length-to-height ratio
- Align joints with substrate joints when applied over concrete or masonry
- On framed walls, veneer joints don’t need to align with sheathing joints
Construction Notes: - Joints must extend fully through the veneer to the substrate
- Use a compressible filler during mortar placement to keep joints clear
- Apply backer rod and sealant at the surface to block moisture
- Minimum joint width: ⅜ inch (10 mm)
- Mesh or lath reinforcement should stop at joints and not bridge across
Proper movement joint design and execution are essential for system longevity and should follow project-specific architectural and engineering requirements.
Can the system be used to span between a plywood substrate and a concrete foundation?
Technically, installations over plywood and concrete should be treated as two separate systems, divided by a properly placed caulk joint to allow for differential movement. In residential or smaller-scale applications, some customers choose to take an educated risk by treating the area as a single installation — omitting the caulk joint for aesthetic reasons. While this approach is common, it is done at the customer’s discretion. Please note that Brick It cannot assume responsibility for any resulting issues, even though the risk of failure may be minimal.
Curved Wall
To achieve a curved wall, various brick patterns may be used.
A running bond is a common starting point, but if the layout appears too "choppy," switching to a header or soldier course may provide a smoother appearance. The choice ultimately depends on the designer's intent and aesthetic preference.
Determining the minimum achievable radius depends on the brick size and selected pattern. As a general guideline, shorter bricks allow for tighter curves. For greater accuracy and visualization, designers and architects are encouraged to model the wall in CAD using actual brick and curve dimensions.
Continuous Insulation, CI
What Thin Brick Sizes Are Available at Brick It?
Brick It offers thin brick in all standard industry sizes. The most popular is the Modular (MOD) size, with a face dimension of 2 1/4" x 7 5/8". Other sizes are also available to accommodate specific project requirements. When purchasing metal panel systems separately, it is important to confirm the brick height to ensure accurate panel compatibility.
I Was Installing Thin Brick and Now I Have Some Cement Smears on the Face. How Do I Clean It Off?
When installed cleanly and carefully, your thin brick veneer should require little to no cleaning. However, if you notice cement smears or residue, some bricks may benefit from a light rinse using a mild-strength cleaning solution.
Here are a few important tips:
- Always follow the cleaning product manufacturer’s instructions carefully.
- We offer several cleaning solutions that are compatible with thin brick surfaces.
- For more advanced guidance, we recommend visiting www.prosoco.com, a trusted industry leader in masonry cleaning products.
Important Caution:
Before applying any chemical cleaner to your actual project, test it on a sample panel or a small, inconspicuous area. Many cleaning products are irreversible and may affect the appearance of the brick if not used properly.
Why Should I Use the Brick It System for Thin Brick Installation?
Installing thin brick veneers requires more than just the brick itself; it requires a complete, well-engineered system. The Brick It System provides all the necessary components to ensure a proper, code-compliant installation, whether for interior or exterior use.
By purchasing all materials directly from Brick It, you benefit from:
- Convenience – Everything you need from one trusted source.
- Compatibility – Products designed to work together for optimal performance.
- Warranty Protection – A system-based warranty supported by a single manufacturer.
- Single Source of Responsibility – One point of contact for technical support, guidance, and accountability.
Choosing the Brick It System ensures peace of mind and a successful thin brick installation.
Which System Should I Use?
The right system depends on your project needs, but here is a quick overview to help you decide:
- Designer Metal Grid (DMG) System
This is our most popular solution. It is the easiest to install, cost-effective, and ideal for both professionals and DIY users. It’s a great choice for most interior and basic exterior applications.
- Moisture Control System (MCS)
If moisture management is a concern, especially for exterior walls, the MCS system offers built-in drainage features and enhanced protection against water intrusion.
- Continuous Insulation System (CI)
This system is ideal when your project requires added thermal performance. It integrates foam insulation and a structural fastening method to help meet modern energy codes while still supporting thin brick installation.
Each system serves a specific purpose, so consider your climate, wall assembly, and performance goals when choosing.
I’m a Skilled Contractor, Why Should I Use Brick-It’s Panel System?
The Brick-It Panel System offers significant benefits even for experienced contractors by enhancing strength, ease of installation, and most importantly, speed.
For comparison:
- With conventional thin-set or thick-set methods, a skilled installer typically places 250 to 350 bricks per day.
- Using the Brick-It metal grid system, that number jumps to 1,100 to 1,400 bricks per day—a 3 to 5× productivity increase.
Much of this output can be achieved with just one mechanic, supported by a small team of helpers, making the system extremely cost-effective. Faster installation means lower labor costs, quicker project turnaround, and more jobs completed with the same crew.
In short, it helps skilled professionals work smarter and more profitably, without compromising quality.
Do You Have Brick it Installers in My Area?
Brick It does not offer installation services and does not employ installers. While we likely have customers who have purchased our systems in your area, we cannot verify or endorse their work, as we haven’t seen their completed projects and cannot speak to their quality or professionalism.
We recommend hiring a trusted local contractor with experience in one of the following trades:
- Stucco installation.
- Carpentry.
- Tile setting.
- Masonry.
- Or a qualified handyman.
Any skilled professional familiar with exterior finishes or panel systems should be able to install Brick It products successfully by following our provided installation guidelines.
What Type of Contractors Install Thin Brick?
The type of contractor best suited for your project will depend on its scope and setting. The following professionals are commonly capable of installing thin brick panel systems:
- Stucco Contractors
- Masons
- Carpenters
- Tile Setters
- Exterior Cladding or Façade Specialists – Particularly for commercial or large-scale exterior applications
- Landscapers, Plumbers, Electricians, and Painters – Often take on small-scale or interior installations
Regardless of trade, it’s important that the installer is detail-oriented, follows our installation guidelines, and is comfortable working with panel systems and masonry materials.
Can the Brick It Panel System Be Used with Other Manufacturers’ Brick?
Yes, the Brick It Panel System is compatible with other manufacturers’ thin brick, as long as the brick conforms to a standard U.S. size. The most important factor is the brick face height, which must match the panel spacing to ensure proper fit and alignment.
We recommend checking your brick dimensions and comparing them with our panel sizing chart before ordering.
What Is the Size of Brick it Metal Panels?
Our metal grid panels are designed to hold three courses of brick, which means the panel height will vary based on the brick face height. Panels are available in two standard lengths: 48" and 96".
- 48" panels are the most commonly used due to their ease of handling, transport, and installation.
- 96" panels are available by special order, but are more challenging to ship and do not necessarily speed up installation.
For more sizing information, please visit the product page by clicking here.
What Tools Are Required to Install Thin Brick?
Most thin brick installations require only basic masonry and tile tools, such as a trowel, mortar bag, level, jointing tool, and a saw or splitter for cutting bricks.
To make things even easier, our System Configurator displays the recommended tools for each specific step of your installation, based on your selected wall assembly and system components. We encourage you to use the configurator when quoting your project to ensure you have everything you need, including the correct tools and accessories.
What Do I Use to Fasten the Metal Grid Panel to the Wall?
We recommend using non-corrosive, preferably ribbed fasteners that provide sufficient penetration to securely anchor the metal grid panel to the substrate. The correct type of fastener will depend on the wall material (e.g., wood, steel, concrete, or masonry) and the specific system being installed.
Using the right fasteners is critical to ensure the long-term performance and stability of your thin brick installation.
You can view our recommended fasteners and purchase options by clicking here.
How Do I Point or Grout Thin Brick?
Follow these steps to properly mix and apply mortar for thin brick joints:
- Mixing the Mortar:
- Empty the entire contents of the 40 lb Brick It mortar mix into a 5-gallon bucket.
- If you've ordered a colored mortar, add the full contents of the accompanying 1.5 lb colorant pack to the same bucket.
- Slowly add clean, cold water while mixing with a 1/2" drill and mortar paddle at low speed (450–550 RPM) until the mixture reaches a smooth, workable consistency.
- The mortar is properly mixed when it flows easily from a mortar bag.
- Application:
- Load the mortar into a mortar bag and apply it to the horizontal joints first, followed by the vertical joints.
- Always overfill joints slightly to ensure there are no air pockets or voids.
- Tooling the Joints:
- Begin checking mortar firmness every 3–5 minutes. Once it reaches a firm but workable consistency, it's ready for tooling.
- Use the joint tool provided in your kit to strike the vertical joints first, then the horizontal ones.
- Hold the tool at a 45° angle and strike the joint to compress and seal the mortar against the brick edges.
- Maintain no more than 1/8” recess from the brick face for proper finish.
- The result will be a concave joint finish. Fill any visible voids as needed.
- Temperature Warning:
- Do not apply mortar when daytime or nighttime temperatures are expected to fall below 40°F, as this can compromise the curing process.
Can I Use a Sponge to Finish the Joints Like a Tile Installer Would?
We do not recommend using a sponge-finish technique for brick joints, as it is commonly done with tile. Unlike glazed tile, most brick surfaces are porous and textured, making it difficult to clean mortar off the face without leaving permanent stains or residue.
That said, if a slightly smeared or weathered appearance is part of your intended aesthetic, this technique might help achieve that look. In any case, we strongly advise testing your method on a sample panel before applying it to the main wall.
Which Moisture Barrier Should I Use?
Although we are not a manufacturer of moisture barriers and cannot recommend a specific brand, we can provide some general guidance based on industry standards. Most professionals now recommend using two layers of moisture protection behind thin brick veneer. This can include:
- Two layers of building paper.
- A combination of one roll-on applied membrane and one sheet-applied layer.
- Pre-bonded 2-ply papers, which unroll together for easier installation.
It’s important to note that brick and mortar are not waterproof—your moisture barrier is the critical line of defense against water intrusion. For this reason, we strongly advise consulting your project architect or building envelope consultant to select the appropriate system.
For moisture control accessories offered through Brick It, click here.
Why Do the Panels Have Rectangular Holes and What Are They For?
The rectangular holes in our panels serve two important functions:
- Water Drainage – Certain holes are specifically designed to allow moisture to escape from behind the brick veneer, helping to prevent water accumulation and potential damage.
- Oil Canning Control – Other holes are strategically placed to help bridge and minimize oil canning, a visual distortion that can occur in flat metal surfaces.
During product development and testing, we discovered that round holes are less effective at drainage, as water tends to flow around them, especially when punched from the back, which creates a subtle burr that deflects water. To address this, we intentionally designed rectangular holes and adjusted the punch direction, improving both drainage and performance.
What Is the Continuous Insulation (CI) System?
Our Continuous Insulation (CI) System is a patented solution designed to meet modern energy code requirements by integrating extruded polystyrene insulation directly into the wall assembly. This system creates a complete thermal break between the interior and exterior of the building, significantly improving energy efficiency and reducing thermal bridging.
It’s an ideal choice for projects prioritizing performance, code compliance, and long-term energy savings.
What Is a Typical Application for the CI System?
The CI (Continuous Insulation) System is most commonly used in commercial construction, particularly on walls built with steel studs and gypsum sheathing. It’s ideal for projects requiring improved thermal performance while maintaining the durability and aesthetics of thin brick veneer.
Why Can’t I Just Fasten the DMG or MCS Panel Directly to the Stud Through the Foam Using Longer Screws?
Foam insulation has no structural value, and fastening through it does not provide a secure or code-compliant attachment. If you attempt to anchor the DMG or MCS panel directly to the studs through the foam, you would essentially be cantilevering the system by the foam's thickness, creating an unsupported gap between the panel and the structural substrate.
This approach compromises stability and may result in failure over time. To date, we have not encountered an engineer who would approve such a method. For a secure and properly engineered installation, the panel system must be anchored directly to a solid structural surface, such as strapping, sheathing, or framing, not through foam alone.
How Strong Is the CI System? How Much Weight Can It Support?
The CI System is engineered for strength and durability. When installed using our structural Batten Plates and specialized screws, it can support approximately 450 lbs per square foot in a worst-case scenario. In more typical installations—without additional strapping—the system can support up to 650 lbs per square foot.
For reference, a standard Brick It system installed over Batten Plates typically weighs around 7 lbs per square foot, which is well within the system’s load-bearing capacity.
These performance figures are based on internal testing and reflect a conservative safety margin for most building conditions.
How Do I Install the Batten Plate Into the Foam? Does the Foam Need to Be Notched?
If you purchase the foam insulation from us, it will come pre-notched every 16" on center to accommodate Batten Plate installation. To install, simply press the Batten Plate into the notched channel. If needed, you can gently tap it into place using a rubber mallet for easier alignment.
This pre-notched feature saves time on-site and ensures proper placement for secure attachment.
Do I Need to Frame My Wall in a Special Way to Install the Continuous Insulation (CI) System?
While special framing is not required, we recommend adding horizontal strapping (every 16" on center) to the wall to simplify installation and ensure consistent fastening. This can be particularly helpful when installing Batten Plates.
To minimize added cost, consider applying strapping specifically at inside and outside corners, where secure attachment is most critical. This targeted reinforcement will help ensure a smooth and durable installation of the CI system.
How Does the Metal Grid System 〈DMD or MCS〉 Compare to Conventional Installation Methods?
Conventional thin brick installation systems are generally slower and more labor-intensive. On average, a skilled installer using a conventional system can set approximately 250 bricks per day. In contrast, the same installer can install around 1,200 bricks per day using one of our metal panel systems (DMD or MCS), making them significantly more efficient.
Thin-set systems are sometimes used for small interior applications—such as kitchen backsplashes or concrete stoops—typically up to 100 square feet in size. Thick-set systems, while slightly lower in material cost, require extensive labor and are rarely used due to their higher total project cost.
Our metal grid systems offer a modern, cost-effective, and time-saving alternative to traditional methods—ideal for both commercial and residential applications.
How Far Will the Brick Project Off the Existing Wall When Using the CI System?
The metal panel component of the CI System is extremely thin—approximately 0.016"—and does not significantly contribute to the overall wall thickness. To determine the full projection of the system from the existing wall, you’ll need to add the thickness of the following components:
The thin brick (dimensions available on each product page under the Shapes & Sizes tab)
Drainage Matt
Insulation
Any additional layers specified in your wall assembly
For accurate planning, it's best to reference each element in your project specification and sum its individual thicknesses.
How Do Thermal Panel Movements Affect Installation?
When installing thin brick panel systems, it is important to allow for thermal expansion and contraction by leaving approximately a 1/4" gap between panels. Based on over 30 years of industry experience, we have not observed issues related to thermal movement when panels are installed correctly. For additional flexibility, we recommend using our hybrid thin brick adhesive. Once cured, it remains permanently flexible and does not harden, accommodating slight movements without compromising bond integrity.
Can I hang pictures, awnings, or attach fixtures to thin brick veneer?
Thin brick veneer is non-structural and not designed to support loads. We generally do not recommend fastening directly into the veneer. Instead, anchor fixtures to the underlying wall structure before applying the veneer.
Best Practices:
- Plan in advance: install backing or supports (e.g., blocking or junction boxes) behind the veneer during rough-in
- For items like sconces, it's acceptable to mount them on a junction box that is securely fastened to the wall
- Ensure all penetrations are properly sealed to maintain water-tightness
- For heavier items such as awnings or shelves, always consult a structural professional and coordinate mounting details before veneer installation.
How does wall deflection affect thin brick veneer installations?
For masonry or concrete substrates, wall deflection is typically not a concern, since the substrate and veneer have similar stiffness. However, when installing thin brick over wood or steel stud framing, deflection must be carefully controlled due to the difference in stiffness between the veneer and the frame.
Code Guidelines:
- The International Building Code (IBC) limits stud wall deflection to L/240 when rigid finishes like thin brick are applied.
- For interior adhered veneer supported by wood floors, vertical floor deflection is limited to L/600.
- A more conservative L/360 limit is recommended to minimize cracking and prevent veneer separation when using stud framing.
- Proper structural design and framing practices are essential for ensuring a durable, long-lasting veneer installation, especially over flexible substrates.
Is a water-resistive barrier (WRB) and drainage system required behind thin brick veneer?
Yes. Both the International Residential Code (IRC) and the International Building Code (IBC) require exterior walls to include:
A water-resistive barrier (WRB)
A means of drainage behind the veneer, with limited exceptions
General Requirements:
WRB must be installed over sheathing or studs in framed wall assemblies
Assemblies tested to ASTM E331 for wind-driven rain resistance may also be exempt
Material Standards:
Acceptable WRB: One layer of No. 15 asphalt felt (ASTM D226, Type I) or other approved material
Over wood-based sheathing:
Use two layers of vapor-permeable WRB (equivalent to Grade D paper), or
A single high-performance WRB (60-minute Grade D equivalent) separated from the veneer by a drainage space or non-absorbent layer
Means of Drainage:
While code does not prescribe exact materials, products such as drainage mats are commonly used and preferred
Brick It’s MCS and CI systems incorporate designed drainage solutions that meet these requirements
WRBs are not required for interior applications, but may still be helpful in preventing moisture damage during installation.
For full compliance, consult your local building codes or refer to the IBC/IRC.
Where and how should flashing and weep screeds be installed in thin brick veneer systems?
Flashing collects moisture that enters the veneer system and channels it out through weeps. Building codes mandate flashing and weep locations to ensure proper drainage and prevent moisture damage.
Required Locations:
- Below the first course, above the final grade (IRC requires flashing or weep screed to extend 1 in. [25 mm] below the foundation plate over stud walls)
- At points of support like shelf angles, lintels, and structural floors
- At wall/roof intersections
- Around all window and door openings (head, jambs, and sills)
- Where masonry meets frame/stucco walls (e.g., chimneys)
- Under copings, sills, and terminations
- Where decks, porches, or stairs connect to framed walls
Installation Details: - The first brick course should sit directly above flashing or screed, without a mortar joint, to facilitate drainage
- Flashing must extend to or beyond the wall face, with the back flange turned up ≥ 3½ in. (89 mm)
- The water-resistive barrier (WRB) should lap over the flashing
- In two-layer WRB assemblies over wood sheathing, flashing should be placed between the layers
- A drip edge or weep screed is recommended if flashing is UV-sensitive
- Without a drip edge, flashing should be cut flush with the wall face
What are the clearance requirements for installing thin brick veneer near grade or paving?
According to the International Residential Code (IRC) and International Building Code (IBC), exterior thin brick veneer over stud walls must maintain minimum clearances for durability and moisture protection:
- 4 inches (102 mm) above finished grade
- 2 inches (51 mm) above paved surfaces
- ½ inch (12 mm) above exterior walking surfaces supported by the same foundation
- Thin brick must also extend at least 1 inch (25 mm) below the top of the concrete or masonry foundation wall
These requirements help prevent moisture damage and ensure long-term performance. Always verify with local building codes or your project’s design professional for compliance.
Why are movement joints important in thin brick veneer systems?
Thin brick veneers can experience differential movement as bricks expand and substrates shrink. To avoid cracking or system failure, properly placed movement joints are critical. These joints allow for natural expansion, contraction, and structural movement.
Placement Guidelines:
- Maximum spacing: 18 feet (5.5 m) vertically or horizontally
- Maximum area between joints: 144 sq. ft. (13.4 m²)
- Preferably square zones with a maximum 2½:1 length-to-height ratio
- Align joints with substrate joints when applied over concrete or masonry
- On framed walls, veneer joints don’t need to align with sheathing joints
Construction Notes: - Joints must extend fully through the veneer to the substrate
- Use a compressible filler during mortar placement to keep joints clear
- Apply backer rod and sealant at the surface to block moisture
- Minimum joint width: ⅜ inch (10 mm)
- Mesh or lath reinforcement should stop at joints and not bridge across
Proper movement joint design and execution are essential for system longevity and should follow project-specific architectural and engineering requirements.
What is a Batten Plate?
A Batten Plate is a structural, 16-gauge galvanized steel L-shaped bracket designed with pre-punched screw holes spaced 16 inches on center. When installed with specialty fasteners, it provides a secure mounting surface for Brick It Metal Grids, lath for Thickset systems, cement stucco, and other siding or cladding materials.
For more information on Batten Plate applications, click here.
Can the system be used to span between a plywood substrate and a concrete foundation?
Technically, installations over plywood and concrete should be treated as two separate systems, divided by a properly placed caulk joint to allow for differential movement. In residential or smaller-scale applications, some customers choose to take an educated risk by treating the area as a single installation — omitting the caulk joint for aesthetic reasons. While this approach is common, it is done at the customer’s discretion. Please note that Brick It cannot assume responsibility for any resulting issues, even though the risk of failure may be minimal.
Thick set System
I Was Installing Thin Brick and Now I Have Some Cement Smears on the Face. How Do I Clean It Off?
When installed cleanly and carefully, your thin brick veneer should require little to no cleaning. However, if you notice cement smears or residue, some bricks may benefit from a light rinse using a mild-strength cleaning solution.
Here are a few important tips:
- Always follow the cleaning product manufacturer’s instructions carefully.
- We offer several cleaning solutions that are compatible with thin brick surfaces.
- For more advanced guidance, we recommend visiting www.prosoco.com, a trusted industry leader in masonry cleaning products.
Important Caution:
Before applying any chemical cleaner to your actual project, test it on a sample panel or a small, inconspicuous area. Many cleaning products are irreversible and may affect the appearance of the brick if not used properly.
What Type of Contractors Install Thin Brick?
The type of contractor best suited for your project will depend on its scope and setting. The following professionals are commonly capable of installing thin brick panel systems:
- Stucco Contractors
- Masons
- Carpenters
- Tile Setters
- Exterior Cladding or Façade Specialists – Particularly for commercial or large-scale exterior applications
- Landscapers, Plumbers, Electricians, and Painters – Often take on small-scale or interior installations
Regardless of trade, it’s important that the installer is detail-oriented, follows our installation guidelines, and is comfortable working with panel systems and masonry materials.
What Tools Are Required to Install Thin Brick?
Most thin brick installations require only basic masonry and tile tools, such as a trowel, mortar bag, level, jointing tool, and a saw or splitter for cutting bricks.
To make things even easier, our System Configurator displays the recommended tools for each specific step of your installation, based on your selected wall assembly and system components. We encourage you to use the configurator when quoting your project to ensure you have everything you need, including the correct tools and accessories.
What Do I Use to Fasten the Metal Grid Panel to the Wall?
We recommend using non-corrosive, preferably ribbed fasteners that provide sufficient penetration to securely anchor the metal grid panel to the substrate. The correct type of fastener will depend on the wall material (e.g., wood, steel, concrete, or masonry) and the specific system being installed.
Using the right fasteners is critical to ensure the long-term performance and stability of your thin brick installation.
You can view our recommended fasteners and purchase options by clicking here.
How Do I Point or Grout Thin Brick?
Follow these steps to properly mix and apply mortar for thin brick joints:
- Mixing the Mortar:
- Empty the entire contents of the 40 lb Brick It mortar mix into a 5-gallon bucket.
- If you've ordered a colored mortar, add the full contents of the accompanying 1.5 lb colorant pack to the same bucket.
- Slowly add clean, cold water while mixing with a 1/2" drill and mortar paddle at low speed (450–550 RPM) until the mixture reaches a smooth, workable consistency.
- The mortar is properly mixed when it flows easily from a mortar bag.
- Application:
- Load the mortar into a mortar bag and apply it to the horizontal joints first, followed by the vertical joints.
- Always overfill joints slightly to ensure there are no air pockets or voids.
- Tooling the Joints:
- Begin checking mortar firmness every 3–5 minutes. Once it reaches a firm but workable consistency, it's ready for tooling.
- Use the joint tool provided in your kit to strike the vertical joints first, then the horizontal ones.
- Hold the tool at a 45° angle and strike the joint to compress and seal the mortar against the brick edges.
- Maintain no more than 1/8” recess from the brick face for proper finish.
- The result will be a concave joint finish. Fill any visible voids as needed.
- Temperature Warning:
- Do not apply mortar when daytime or nighttime temperatures are expected to fall below 40°F, as this can compromise the curing process.
Can I Use a Sponge to Finish the Joints Like a Tile Installer Would?
We do not recommend using a sponge-finish technique for brick joints, as it is commonly done with tile. Unlike glazed tile, most brick surfaces are porous and textured, making it difficult to clean mortar off the face without leaving permanent stains or residue.
That said, if a slightly smeared or weathered appearance is part of your intended aesthetic, this technique might help achieve that look. In any case, we strongly advise testing your method on a sample panel before applying it to the main wall.
What’s the Purpose of the Drainage Mat?
The drainage mat plays a critical role in managing moisture behind thin brick veneer. Made from high-impact materials, it allows for the rapid exit of water that brick naturally absorbs, promoting continuous airflow between the veneer and the structural wall. This helps prevent moisture buildup, mold, and long-term damage to the building envelope.
Which Moisture Barrier Should I Use?
Although we are not a manufacturer of moisture barriers and cannot recommend a specific brand, we can provide some general guidance based on industry standards. Most professionals now recommend using two layers of moisture protection behind thin brick veneer. This can include:
- Two layers of building paper.
- A combination of one roll-on applied membrane and one sheet-applied layer.
- Pre-bonded 2-ply papers, which unroll together for easier installation.
It’s important to note that brick and mortar are not waterproof—your moisture barrier is the critical line of defense against water intrusion. For this reason, we strongly advise consulting your project architect or building envelope consultant to select the appropriate system.
For moisture control accessories offered through Brick It, click here.
How Does the Metal Grid System 〈DMD or MCS〉 Compare to Conventional Installation Methods?
Conventional thin brick installation systems are generally slower and more labor-intensive. On average, a skilled installer using a conventional system can set approximately 250 bricks per day. In contrast, the same installer can install around 1,200 bricks per day using one of our metal panel systems (DMD or MCS), making them significantly more efficient.
Thin-set systems are sometimes used for small interior applications—such as kitchen backsplashes or concrete stoops—typically up to 100 square feet in size. Thick-set systems, while slightly lower in material cost, require extensive labor and are rarely used due to their higher total project cost.
Our metal grid systems offer a modern, cost-effective, and time-saving alternative to traditional methods—ideal for both commercial and residential applications.
Can I hang pictures, awnings, or attach fixtures to thin brick veneer?
Thin brick veneer is non-structural and not designed to support loads. We generally do not recommend fastening directly into the veneer. Instead, anchor fixtures to the underlying wall structure before applying the veneer.
Best Practices:
- Plan in advance: install backing or supports (e.g., blocking or junction boxes) behind the veneer during rough-in
- For items like sconces, it's acceptable to mount them on a junction box that is securely fastened to the wall
- Ensure all penetrations are properly sealed to maintain water-tightness
- For heavier items such as awnings or shelves, always consult a structural professional and coordinate mounting details before veneer installation.
How does wall deflection affect thin brick veneer installations?
For masonry or concrete substrates, wall deflection is typically not a concern, since the substrate and veneer have similar stiffness. However, when installing thin brick over wood or steel stud framing, deflection must be carefully controlled due to the difference in stiffness between the veneer and the frame.
Code Guidelines:
- The International Building Code (IBC) limits stud wall deflection to L/240 when rigid finishes like thin brick are applied.
- For interior adhered veneer supported by wood floors, vertical floor deflection is limited to L/600.
- A more conservative L/360 limit is recommended to minimize cracking and prevent veneer separation when using stud framing.
- Proper structural design and framing practices are essential for ensuring a durable, long-lasting veneer installation, especially over flexible substrates.
Is a water-resistive barrier (WRB) and drainage system required behind thin brick veneer?
Yes. Both the International Residential Code (IRC) and the International Building Code (IBC) require exterior walls to include:
A water-resistive barrier (WRB)
A means of drainage behind the veneer, with limited exceptions
General Requirements:
WRB must be installed over sheathing or studs in framed wall assemblies
Assemblies tested to ASTM E331 for wind-driven rain resistance may also be exempt
Material Standards:
Acceptable WRB: One layer of No. 15 asphalt felt (ASTM D226, Type I) or other approved material
Over wood-based sheathing:
Use two layers of vapor-permeable WRB (equivalent to Grade D paper), or
A single high-performance WRB (60-minute Grade D equivalent) separated from the veneer by a drainage space or non-absorbent layer
Means of Drainage:
While code does not prescribe exact materials, products such as drainage mats are commonly used and preferred
Brick It’s MCS and CI systems incorporate designed drainage solutions that meet these requirements
WRBs are not required for interior applications, but may still be helpful in preventing moisture damage during installation.
For full compliance, consult your local building codes or refer to the IBC/IRC.
Where and how should flashing and weep screeds be installed in thin brick veneer systems?
Flashing collects moisture that enters the veneer system and channels it out through weeps. Building codes mandate flashing and weep locations to ensure proper drainage and prevent moisture damage.
Required Locations:
- Below the first course, above the final grade (IRC requires flashing or weep screed to extend 1 in. [25 mm] below the foundation plate over stud walls)
- At points of support like shelf angles, lintels, and structural floors
- At wall/roof intersections
- Around all window and door openings (head, jambs, and sills)
- Where masonry meets frame/stucco walls (e.g., chimneys)
- Under copings, sills, and terminations
- Where decks, porches, or stairs connect to framed walls
Installation Details: - The first brick course should sit directly above flashing or screed, without a mortar joint, to facilitate drainage
- Flashing must extend to or beyond the wall face, with the back flange turned up ≥ 3½ in. (89 mm)
- The water-resistive barrier (WRB) should lap over the flashing
- In two-layer WRB assemblies over wood sheathing, flashing should be placed between the layers
- A drip edge or weep screed is recommended if flashing is UV-sensitive
- Without a drip edge, flashing should be cut flush with the wall face
What are the clearance requirements for installing thin brick veneer near grade or paving?
According to the International Residential Code (IRC) and International Building Code (IBC), exterior thin brick veneer over stud walls must maintain minimum clearances for durability and moisture protection:
- 4 inches (102 mm) above finished grade
- 2 inches (51 mm) above paved surfaces
- ½ inch (12 mm) above exterior walking surfaces supported by the same foundation
- Thin brick must also extend at least 1 inch (25 mm) below the top of the concrete or masonry foundation wall
These requirements help prevent moisture damage and ensure long-term performance. Always verify with local building codes or your project’s design professional for compliance.
Why are movement joints important in thin brick veneer systems?
Thin brick veneers can experience differential movement as bricks expand and substrates shrink. To avoid cracking or system failure, properly placed movement joints are critical. These joints allow for natural expansion, contraction, and structural movement.
Placement Guidelines:
- Maximum spacing: 18 feet (5.5 m) vertically or horizontally
- Maximum area between joints: 144 sq. ft. (13.4 m²)
- Preferably square zones with a maximum 2½:1 length-to-height ratio
- Align joints with substrate joints when applied over concrete or masonry
- On framed walls, veneer joints don’t need to align with sheathing joints
Construction Notes: - Joints must extend fully through the veneer to the substrate
- Use a compressible filler during mortar placement to keep joints clear
- Apply backer rod and sealant at the surface to block moisture
- Minimum joint width: ⅜ inch (10 mm)
- Mesh or lath reinforcement should stop at joints and not bridge across
Proper movement joint design and execution are essential for system longevity and should follow project-specific architectural and engineering requirements.
Can the system be used to span between a plywood substrate and a concrete foundation?
Technically, installations over plywood and concrete should be treated as two separate systems, divided by a properly placed caulk joint to allow for differential movement. In residential or smaller-scale applications, some customers choose to take an educated risk by treating the area as a single installation — omitting the caulk joint for aesthetic reasons. While this approach is common, it is done at the customer’s discretion. Please note that Brick It cannot assume responsibility for any resulting issues, even though the risk of failure may be minimal.
Thin set System
I Was Installing Thin Brick and Now I Have Some Cement Smears on the Face. How Do I Clean It Off?
When installed cleanly and carefully, your thin brick veneer should require little to no cleaning. However, if you notice cement smears or residue, some bricks may benefit from a light rinse using a mild-strength cleaning solution.
Here are a few important tips:
- Always follow the cleaning product manufacturer’s instructions carefully.
- We offer several cleaning solutions that are compatible with thin brick surfaces.
- For more advanced guidance, we recommend visiting www.prosoco.com, a trusted industry leader in masonry cleaning products.
Important Caution:
Before applying any chemical cleaner to your actual project, test it on a sample panel or a small, inconspicuous area. Many cleaning products are irreversible and may affect the appearance of the brick if not used properly.
What Type of Contractors Install Thin Brick?
The type of contractor best suited for your project will depend on its scope and setting. The following professionals are commonly capable of installing thin brick panel systems:
- Stucco Contractors
- Masons
- Carpenters
- Tile Setters
- Exterior Cladding or Façade Specialists – Particularly for commercial or large-scale exterior applications
- Landscapers, Plumbers, Electricians, and Painters – Often take on small-scale or interior installations
Regardless of trade, it’s important that the installer is detail-oriented, follows our installation guidelines, and is comfortable working with panel systems and masonry materials.
What Tools Are Required to Install Thin Brick?
Most thin brick installations require only basic masonry and tile tools, such as a trowel, mortar bag, level, jointing tool, and a saw or splitter for cutting bricks.
To make things even easier, our System Configurator displays the recommended tools for each specific step of your installation, based on your selected wall assembly and system components. We encourage you to use the configurator when quoting your project to ensure you have everything you need, including the correct tools and accessories.
What Do I Use to Fasten the Metal Grid Panel to the Wall?
We recommend using non-corrosive, preferably ribbed fasteners that provide sufficient penetration to securely anchor the metal grid panel to the substrate. The correct type of fastener will depend on the wall material (e.g., wood, steel, concrete, or masonry) and the specific system being installed.
Using the right fasteners is critical to ensure the long-term performance and stability of your thin brick installation.
You can view our recommended fasteners and purchase options by clicking here.
How Do I Point or Grout Thin Brick?
Follow these steps to properly mix and apply mortar for thin brick joints:
- Mixing the Mortar:
- Empty the entire contents of the 40 lb Brick It mortar mix into a 5-gallon bucket.
- If you've ordered a colored mortar, add the full contents of the accompanying 1.5 lb colorant pack to the same bucket.
- Slowly add clean, cold water while mixing with a 1/2" drill and mortar paddle at low speed (450–550 RPM) until the mixture reaches a smooth, workable consistency.
- The mortar is properly mixed when it flows easily from a mortar bag.
- Application:
- Load the mortar into a mortar bag and apply it to the horizontal joints first, followed by the vertical joints.
- Always overfill joints slightly to ensure there are no air pockets or voids.
- Tooling the Joints:
- Begin checking mortar firmness every 3–5 minutes. Once it reaches a firm but workable consistency, it's ready for tooling.
- Use the joint tool provided in your kit to strike the vertical joints first, then the horizontal ones.
- Hold the tool at a 45° angle and strike the joint to compress and seal the mortar against the brick edges.
- Maintain no more than 1/8” recess from the brick face for proper finish.
- The result will be a concave joint finish. Fill any visible voids as needed.
- Temperature Warning:
- Do not apply mortar when daytime or nighttime temperatures are expected to fall below 40°F, as this can compromise the curing process.
Can I Use a Sponge to Finish the Joints Like a Tile Installer Would?
We do not recommend using a sponge-finish technique for brick joints, as it is commonly done with tile. Unlike glazed tile, most brick surfaces are porous and textured, making it difficult to clean mortar off the face without leaving permanent stains or residue.
That said, if a slightly smeared or weathered appearance is part of your intended aesthetic, this technique might help achieve that look. In any case, we strongly advise testing your method on a sample panel before applying it to the main wall.
Which Moisture Barrier Should I Use?
Although we are not a manufacturer of moisture barriers and cannot recommend a specific brand, we can provide some general guidance based on industry standards. Most professionals now recommend using two layers of moisture protection behind thin brick veneer. This can include:
- Two layers of building paper.
- A combination of one roll-on applied membrane and one sheet-applied layer.
- Pre-bonded 2-ply papers, which unroll together for easier installation.
It’s important to note that brick and mortar are not waterproof—your moisture barrier is the critical line of defense against water intrusion. For this reason, we strongly advise consulting your project architect or building envelope consultant to select the appropriate system.
For moisture control accessories offered through Brick It, click here.
How Does the Metal Grid System 〈DMD or MCS〉 Compare to Conventional Installation Methods?
Conventional thin brick installation systems are generally slower and more labor-intensive. On average, a skilled installer using a conventional system can set approximately 250 bricks per day. In contrast, the same installer can install around 1,200 bricks per day using one of our metal panel systems (DMD or MCS), making them significantly more efficient.
Thin-set systems are sometimes used for small interior applications—such as kitchen backsplashes or concrete stoops—typically up to 100 square feet in size. Thick-set systems, while slightly lower in material cost, require extensive labor and are rarely used due to their higher total project cost.
Our metal grid systems offer a modern, cost-effective, and time-saving alternative to traditional methods—ideal for both commercial and residential applications.
Can I hang pictures, awnings, or attach fixtures to thin brick veneer?
Thin brick veneer is non-structural and not designed to support loads. We generally do not recommend fastening directly into the veneer. Instead, anchor fixtures to the underlying wall structure before applying the veneer.
Best Practices:
- Plan in advance: install backing or supports (e.g., blocking or junction boxes) behind the veneer during rough-in
- For items like sconces, it's acceptable to mount them on a junction box that is securely fastened to the wall
- Ensure all penetrations are properly sealed to maintain water-tightness
- For heavier items such as awnings or shelves, always consult a structural professional and coordinate mounting details before veneer installation.
Can thin brick be used as flooring on an exterior patio exposed to snow?
Yes, many of our thin bricks can be installed on exterior patios exposed to snow and weather. However, performance and appearance may vary depending on the brick type and installation method.
Brick Selection:
- Bricks in our Floor Brick category, especially wire-cut or tumbled options, are generally suitable for exterior use. Some bricks may age or weather differently, which can add a desired aesthetic for certain clients.
Installation Guidelines:
- Install over a concrete slab using a thin-set method (a non-proprietary tile installation technique)
- Do not use standard tile grouting methods — bricks typically do not clean as easily as tile and improper grouting may lead to poor results
- Always test your process on a sample panel before grouting the main area to confirm the desired finish and cleanability
For best results, follow industry standards and consult a qualified installer familiar with exterior thin brick applications.
How does wall deflection affect thin brick veneer installations?
For masonry or concrete substrates, wall deflection is typically not a concern, since the substrate and veneer have similar stiffness. However, when installing thin brick over wood or steel stud framing, deflection must be carefully controlled due to the difference in stiffness between the veneer and the frame.
Code Guidelines:
- The International Building Code (IBC) limits stud wall deflection to L/240 when rigid finishes like thin brick are applied.
- For interior adhered veneer supported by wood floors, vertical floor deflection is limited to L/600.
- A more conservative L/360 limit is recommended to minimize cracking and prevent veneer separation when using stud framing.
- Proper structural design and framing practices are essential for ensuring a durable, long-lasting veneer installation, especially over flexible substrates.
Is a water-resistive barrier (WRB) and drainage system required behind thin brick veneer?
Yes. Both the International Residential Code (IRC) and the International Building Code (IBC) require exterior walls to include:
A water-resistive barrier (WRB)
A means of drainage behind the veneer, with limited exceptions
General Requirements:
WRB must be installed over sheathing or studs in framed wall assemblies
Assemblies tested to ASTM E331 for wind-driven rain resistance may also be exempt
Material Standards:
Acceptable WRB: One layer of No. 15 asphalt felt (ASTM D226, Type I) or other approved material
Over wood-based sheathing:
Use two layers of vapor-permeable WRB (equivalent to Grade D paper), or
A single high-performance WRB (60-minute Grade D equivalent) separated from the veneer by a drainage space or non-absorbent layer
Means of Drainage:
While code does not prescribe exact materials, products such as drainage mats are commonly used and preferred
Brick It’s MCS and CI systems incorporate designed drainage solutions that meet these requirements
WRBs are not required for interior applications, but may still be helpful in preventing moisture damage during installation.
For full compliance, consult your local building codes or refer to the IBC/IRC.
Where and how should flashing and weep screeds be installed in thin brick veneer systems?
Flashing collects moisture that enters the veneer system and channels it out through weeps. Building codes mandate flashing and weep locations to ensure proper drainage and prevent moisture damage.
Required Locations:
- Below the first course, above the final grade (IRC requires flashing or weep screed to extend 1 in. [25 mm] below the foundation plate over stud walls)
- At points of support like shelf angles, lintels, and structural floors
- At wall/roof intersections
- Around all window and door openings (head, jambs, and sills)
- Where masonry meets frame/stucco walls (e.g., chimneys)
- Under copings, sills, and terminations
- Where decks, porches, or stairs connect to framed walls
Installation Details: - The first brick course should sit directly above flashing or screed, without a mortar joint, to facilitate drainage
- Flashing must extend to or beyond the wall face, with the back flange turned up ≥ 3½ in. (89 mm)
- The water-resistive barrier (WRB) should lap over the flashing
- In two-layer WRB assemblies over wood sheathing, flashing should be placed between the layers
- A drip edge or weep screed is recommended if flashing is UV-sensitive
- Without a drip edge, flashing should be cut flush with the wall face
What are the clearance requirements for installing thin brick veneer near grade or paving?
According to the International Residential Code (IRC) and International Building Code (IBC), exterior thin brick veneer over stud walls must maintain minimum clearances for durability and moisture protection:
- 4 inches (102 mm) above finished grade
- 2 inches (51 mm) above paved surfaces
- ½ inch (12 mm) above exterior walking surfaces supported by the same foundation
- Thin brick must also extend at least 1 inch (25 mm) below the top of the concrete or masonry foundation wall
These requirements help prevent moisture damage and ensure long-term performance. Always verify with local building codes or your project’s design professional for compliance.
Why are movement joints important in thin brick veneer systems?
Thin brick veneers can experience differential movement as bricks expand and substrates shrink. To avoid cracking or system failure, properly placed movement joints are critical. These joints allow for natural expansion, contraction, and structural movement.
Placement Guidelines:
- Maximum spacing: 18 feet (5.5 m) vertically or horizontally
- Maximum area between joints: 144 sq. ft. (13.4 m²)
- Preferably square zones with a maximum 2½:1 length-to-height ratio
- Align joints with substrate joints when applied over concrete or masonry
- On framed walls, veneer joints don’t need to align with sheathing joints
Construction Notes: - Joints must extend fully through the veneer to the substrate
- Use a compressible filler during mortar placement to keep joints clear
- Apply backer rod and sealant at the surface to block moisture
- Minimum joint width: ⅜ inch (10 mm)
- Mesh or lath reinforcement should stop at joints and not bridge across
Proper movement joint design and execution are essential for system longevity and should follow project-specific architectural and engineering requirements.
Can the system be used to span between a plywood substrate and a concrete foundation?
Technically, installations over plywood and concrete should be treated as two separate systems, divided by a properly placed caulk joint to allow for differential movement. In residential or smaller-scale applications, some customers choose to take an educated risk by treating the area as a single installation — omitting the caulk joint for aesthetic reasons. While this approach is common, it is done at the customer’s discretion. Please note that Brick It cannot assume responsibility for any resulting issues, even though the risk of failure may be minimal.
Brick Cutting
Cutting Full Brick Into a Thin Veneer Sounds Expensive. Is It?
Not necessarily. At Brick It, we cut high volumes of full brick into thin veneer using fully automated, precision equipment. Our process is optimized for efficiency, making it cost-competitive with manufactured thin brick, especially when cutting molded bricks, which often yield two thin bricks per unit. In many cases, the cost difference is minimal, and a detailed quote will clearly demonstrate the value. Cutting is an innovative solution when specific colors, textures, or matching requirements are needed.
Do Bricks Break During Cutting?
Yes, some brick breakage is normal during the cutting process. This is often due to microscopic cracks that naturally form in the brick during the firing stage. Because of this, recovery is never 100%. At Brick It, any brick that breaks cleanly into two usable pieces is still packaged and shipped with your order. These pieces can often be used for cuts, edges, or—in the case of reclaimed products installed seamlessly side by side to maintain the desired appearance.
Can I Cut Full Bed Brick Into a Veneer Myself?
Yes, it’s possible to cut full bed brick into thin veneer on your own, and many professionals do so on small-scale jobs. However, for larger projects requiring hundreds or thousands of cuts, it’s not recommended. Cutting brick generates significant waste, requires proper blade configuration, and produces large volumes of wastewater, potentially up to one gallon per cut. Without industrial-grade equipment and proper disposal systems, the process quickly becomes inefficient and labor-intensive. For large or time-sensitive projects, using a professional cutting service is a more practical solution.
Can All Bricks Be Cut Into a Veneer?
Yes, virtually all bricks can be cut into thin veneers, regardless of their hardness. Some bricks may cut more easily than others depending on their density and composition, but our specialized equipment is capable of handling a wide range of brick types. If you have concerns about a specific brick, our team is happy to evaluate it for suitability.
Can I Bring My Own Brick to Be Cut Into a Veneer?
Yes, absolutely. Our Brick Cutting Service is called BYOB – Bring Your Own Brick. You're welcome to supply your own full-size brick for us to cut into thin veneer. Alternatively, you can choose from our extensive inventory of bricks, and we’ll handle the cutting for you. This service is ideal for matching existing brickwork or achieving a custom look not available in manufactured thin brick.
How Many Thin Bricks Can I Get Out of One Full Brick When Cutting?
It depends on the type of full brick being cut. Extruded bricks typically yield only one thin brick face or one thin brick corner per full brick. Molded bricks, on the other hand, can usually produce two thin brick faces or one corner unit. The final yield also depends on the brick’s dimensions, texture, and any defects that may occur during cutting.
What Does Brick It Do With the Brick Waste Produced from Cutting?
At Brick It, we are committed to environmentally responsible practices. All brick waste generated from our cutting operations is recycled. Some of it is repurposed as base material in road construction, while other portions are ground down for use as clay in baseball fields, tennis courts, and similar applications. This approach helps reduce landfill waste and supports sustainable material reuse.
Are All Brick-It Thin Brick Veneers Cut from Full Brick?
Not all of Brick-It’s thin brick veneers are cut from full brick. We offer a large selection of manufactured thin brick that is made to standard thin veneer specifications. However, to expand our offerings and meet the demand for unique colors, textures, and specific matches, we also provide a brick-cutting service. Cutting full-size bricks into veneers allows us to offer options that may not be available in manufactured thin brick form. Please note that not every brick type can be successfully cut into thin veneer due to its composition or structure.
Is Cut Brick Better Than Manufactured Thin Brick?
Both cut brick and manufactured thin brick are high-quality options, and each has its place depending on the project. Cut brick offers the benefit of matching existing full brick when a perfect color or texture match is needed. Manufactured thin brick, on the other hand, is purpose-made to specific dimensions and may be more cost-effective when readily available. At Brick It, we often say: “If it’s available in thin brick, don’t cut it.” Cutting is best reserved for cases where a specific match or unique brick is required.
When Full Bed Brick Is Cut Into a Veneer, What Thickness Do You Cut It At?
While not all thin bricks we offer are cut from full bed brick, those that are are typically cut to a standard thickness of 5/8 or 3/4 inch. However, we can customize the thickness upon request to meet specific design or architectural requirements. This flexibility is especially useful for details such as rowlock bands, quoins, chimney accents, and other decorative elements that may call for a thicker profile.
What Tools Should I Use to Cut Thin Brick?
Thin bricks can be cut using a diamond blade, typically mounted on a wet tile saw or dry cutting saw. For clean, straight cuts, especially on larger projects, a tile saw is commonly used.
However, for quick and efficient splitting, particularly on job sites without access to power tools, a manual brick splitter is a highly effective and convenient option.
Both tools serve different needs, and many professionals find it helpful to have both on hand, depending on the cut quality and volume required.
Shipping
What Do I Have to Do When the Product Arrives?
Upon delivery, carefully inspect your shipment for any visible signs of damage that may have occurred in transit. Locate the packing slip pouch, remove the shipping documents, and verify that all quantities match your order.
If you've ordered cut brick: please note that the cutting process involves masonry wet saws, which may leave some residual moisture in the product. Because of this, cut brick is made to order, shipped immediately, and intended to be unpacked and installed promptly. This allows the material to acclimate to its environment naturally and ensures optimal performance.
How Much Does It Cost to Ship Brick It Products?
Shipping costs vary and depend on several factors, including the size of your order, the delivery distance, and the ship-from location, which is often based on product selection and inventory availability. Because of these variables, we do not offer flat-rate shipping. Instead, each shipment is custom-quoted and entered into a competitive bidding pool, where carriers compete for your business, ensuring you receive the best possible rate.
For the most accurate pricing, we recommend using our proprietary online shipping tools, which calculate live, real-time freight costs based on your specific order details.
Can I Pick Up Material Myself?
Yes, you can pick up material directly from our facility. However, this may not be feasible in all situations, depending on the product type, packaging, or order volume. Please contact us in advance to confirm availability and logistics.
Important: If you choose to pick up your order at our New York location and do not use a third-party shipping company, New York State Sales Tax will apply.
Can I Arrange My Own Shipping?
Yes, you are welcome to arrange your own shipping. However, in most cases, it’s not the most beneficial option for customers. If there is any damage, loss, or shortage during transit, you will be solely responsible for filing and managing the claim with your carrier. Since Brick It is not the shipping party in that case, we won’t be able to assist or intervene on your behalf. For peace of mind and simplified logistics, we recommend using our shipping services, which are optimized for handling heavy and fragile materials like brick.
What Should I Do If I Notice Shipment Damage?
If you notice any damage upon delivery, please accept the shipment but do not discard any damaged material, as it may be required for claim processing.
Follow these steps immediately:
- Use the driver as your witness – point out the damage during delivery.
- Take clear, detailed photos of the damaged material and packaging.
- Assess and quantify the damaged items to the best of your ability.
- Make detailed notes on the Bill of Lading describing the damage.
- Have the driver sign or initial your notes for verification.
Once documented, contact our customer service department right away. With proper documentation, we’ll arrange for a replacement shipment as quickly as possible and handle the freight claim directly with the carrier.
Again, do not discard any damaged materials, as they may be inspected during the claim process.
How is Brick It product shipped? What are the available shipping methods?
Shipping methods vary based on the size and weight of the order. Samples and small orders (up to 150 lbs) are typically shipped via parcel carriers such as UPS or FedEx. Most standard orders are shipped on pallets using LTL (Less Than Truckload) freight services, while larger orders exceeding 20,000 lbs are shipped via FTL (Full Truckload). We also offer shipping via rail and sea containers when applicable. Air freight is rarely used due to the product’s weight. Please note: like most construction material deliveries, shipments are typically limited to curbside drop-off.
Accounting
Can I Receive an Invoice Before I Place an Order?
Yes, upon request, we can provide a Pro Forma Invoice, which serves as a formal quote or order confirmation. However, please note that a Pro Forma Invoice is not a final invoice. Final invoices are generated and sent for each actual shipment, and details may differ if changes occur during the sales or fulfillment process.
For accuracy and consistency, we recommend issuing a purchase order (PO) to Brick It based on confirmed material quantities and pricing. From there, you can submit a prepayment, verify materials upon delivery using the packing slip, and reconcile everything once the final invoice is received. This approach ensures a clear paper trail and minimizes discrepancies.
What’s a Packing Slip?
A packing slip is a document generated in our warehouse at the time of shipment. It lists the quantities of materials that were actually shipped, not what was originally ordered. Please note that shipped quantities may differ from ordered quantities due to partial shipments, backorders, or other adjustments. Always refer to the packing slip when verifying delivered materials.
I Have Paid for My Order; Why Did I Receive an Invoice?
Invoices are issued based on materials shipped, not on prepayments. Even if your order has been prepaid in full, an invoice will still be generated for each shipment as a record of what was delivered. This ensures transparency and accurate documentation for both parties.
What’s a Picking Slip?
A picking slip is an internal warehouse document used by Brick It to guide the order packing process. It lists the items and quantities that need to be gathered for shipment. This document is primarily for internal use and generally does not concern customers.
What Is an Order Confirmation?
An order confirmation is a document that outlines the agreed-upon material quantities, pricing, and details of your order. It may be delivered as a printed copy, PDF, or email. Customers are responsible for reviewing the confirmation carefully to ensure accuracy. Any discrepancies should be reported immediately to avoid delays or errors in fulfillment.
Does Brick It Issue Account Statements?
Yes. Brick It issues account statements on a bi-weekly basis, but only if there is an open balance on the account. If your account is paid in full, you will not automatically receive a statement. Detailed account activity statements are also available upon request at any time.
Do I Have to Pay Sales Tax on Materials Used in a Capital Improvement Project?
Yes. In most cases, contractors must pay sales tax on building materials and tangible personal property used in capital improvement projects—even if the project itself is exempt from sales tax.
For example, in New York State, if a contractor performs work that qualifies as a capital improvement, they are not required to charge the customer sales tax. However, the contractor must still pay tax on the materials purchased for the job. No refund or credit is available for this tax, unless the contractor qualifies to use Form ST-120.1 (Contractor Exempt Purchase Certificate).
Capital improvement projects are further detailed in NYS Publication 862, which also helps distinguish between taxable repairs and exempt capital improvements. Note that tax exemptions may apply if the work is being done for a tax-exempt organization.
About Brick It
How long has Brick It been in business?
Brick It has been proudly serving customers and supplying innovative brick installation systems for nearly 50 years.

Any questions so far?
We can help.
If you need help with your order or consult our design experts for advice, do not hesitate to contact us. We're happy to help!
