


Frequently Asked Questions
Installation over plywood and concrete should be treated as two separate areas separated by the caulk joint that allows movement. However, in residential, small installation, most customers will take an educated risk and treat this as one installation without the often ecstatically unpleasant caulk joint. This is entirely the customer’s call, and Brick It cannot be held responsible in case of failure even if the chances of that occurring are low.
Thin brick veneers may experience differential movement as the brick expand and the substrate or mortar bed shrinks. To accommodate this movement, a system of movement joints should be installed through the entire layer of adhered thin brick veneer. If movement joints are not placed properly or are not used at all, cracking may occur.
Spacing. The distance between movement joints should not be more than 18 ft (5.5 m) either vertically or horizontally. Areas between movement joints should not exceed 144 sq ft (13.4 m²). Veneer areas between movement joints should preferably be square in shape but may have a maximum length-to-height or height-tolength ratio of 2½ to 1. Where thin brick veneer is adhered to a masonry or concrete substrate, the movement joints through the veneer should be installed directly over and aligned with movement joints in the substrate. Where thin brick veneer is installed on studs, the movement joints through the veneer are not necessarily required to be aligned with movement joints through the sheathing on the studs. Where lath or mesh are used, attachment should allow free movement of the veneer between movement joints.
Construction. Movement joints should extend from the exterior surface of the adhered veneer to the substrate beneath the thin brick. Alignment of movement joints with those in the substrate is more easily achieved when they are formed during installation of mortar beds. A compressible filler strip set during mortar placement can provide the space needed for the joint as well as aid in keeping the joint free of mortar or other obstructions. At the exterior surface, a backer rod and sealant prevent water penetration, as shown in Figure 7. Movement joints must be at least as wide as joints in the substrate that they are placed directly over. The minimum recommended width of movement joints through adhered veneer is ⅜ in. (10 mm). In thick set applications, lath or mesh reinforcement should stop on each side and not continue through the movement joint, as shown in Figure 8.
Credit: Brick Industry Association
Credit: Brick Industry Association
Flashing is a material that collects water drained from the veneer assembly and directs it out of the wall through weeps. Building codes require flashing and weeps at the following locations:
- Beneath the first course of veneer above final grade. The IRC requires the flashing (or weep screed) to extend a minimum of 1 in. (25 mm) below the foundation plate line for exterior applications over stud walls. To promote drainage, install the first course of veneer directly above the flashing or screed, without a mortar/grout joint.
- At points of support, such as shelf angles, lintels and structural floors.
- At wall and roof intersections.
- At the heads, jambs and sills of exterior window and door openings.
- At the intersection of chimneys or other masonry construction with frame or stucco walls.
- Under and at the ends of copings and sills.
- Where exterior porches, decks or stairs attach to a wall or floor assembly of wood or steel stud construction.
The flashing or weep screed should extend to the exterior wall surface or beyond, with the back edge (attachment flange) turned up at least 3½ in. (89 mm) vertically. The water-resistive barrier should lap over the flashing or weep screed. In assemblies with two layers of water-resistive barrier installed over a wood-based sheathing, direct the flashing between the layers. Extending flashing beyond the wall surface to form a drip is recommended. When using a flashing that deteriorates with UV exposure, a separate drip edge or weep screed can accomplish this. When a drip edge/weep screed is not used, such flashings should stop, or be cut, flush with the face of the wall. Typical head, jamb and sill flashing details are shown below.
Credit: Brick Industry Association
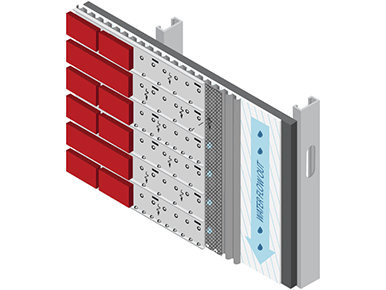
The code indicates that a water-resistive barrier can be either one layer of No. 15 asphalt felt complying with ASTM D226, Type 1, or other approved material. As noted in the 2009 IRC Commentary [Ref. 2], field experience, and testing [Ref. 7] have shown that using two layers of building paper in exterior applications of stucco considerably decreases the penetration of moisture. Where installed over wood-based sheathing, the IRC and IBC require two layers of vapor-permeable water-resistive barrier with a performance equivalent to two layers of Grade D building paper, or a single layer of water-resistive barrier with a water resistance equal to or greater than 60-minute Grade D paper that is separated from the veneer by a designed drainage space or a layer of material that does not absorb water. These codes do not indicate specific materials or methods that qualify as providing a means of drainage; however, products such as drainage mats are often used to meet means-of-drainage requirements. Because they are specifically designed to provide the separation and means of drainage required by code, the inclusion of designed drainage spaces or drainage mats, as shown on our MCS and CI systems pages, is preferred. A water-resistive barrier is not required for interior applications but may be beneficial in protecting building materials from moisture during installation. For further information, refer to the IBC [Ref. 1] and IRC [Ref. 2].
For thin brick veneer with a substrate of masonry or concrete, deflection is not a concern, because the flexural stiffness of the veneer is similar to that of masonry and concrete. When the substrate wall is wood or steel stud framing, out-of-plane deflection of the framing must be considered, because the stiffness of the veneer can be substantially greater than the stud framing. The IBC limits the deflection of stud framing to a maximum of L/240 when rigid finishes like thin brick are applied. For interior adhered veneer applications supported by wood floors, the IBC limits the vertical deflection of the floor system to L/600. To decrease potential cracking and the potential for the veneer to separate from the stud framing, a wall deflection limit of L/360 is recommended when a wood or steel stud framing substrate is used.
In over 30 years of experience with thin brick panel systems, we have never experienced any issues with the expansion and contractions of the panels. If you are still concerned, we recommend the use of our silicone thin brick adhesive which never hardens when fully cured.
Brick thickness can be obtained on the product page in the shape and sizes tab.
- Product contains pre-consumer recycled content
- Product contains post-consumer recycled content
- Product is recyclable or biodegradable after use
- Product contributes to USGBC LEED-NC v2.2 and LEED 2009 credits, www.usgbc.org
Materials and Resources
- MR Credit 3 - Resource reuse
- MR Credit 4 - Recycled content
- MR Credit 5 - Local/regional materials
Indoor Environmental Quality
- EQ Credit 4.1 - Low-emitting adhesives and sealants
Innovation and Design Process
- ID Credit 1 - Innovative design features
Please click here and see it for yourself.
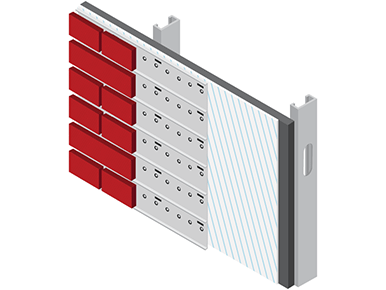
- Always anchor grid to substrate securely with adequate fasteners. Concrete and masonry walls require fasteners and adhesive on rear of metal grid.
- Always use a waterproof covering to protect substrates before installing gird in all your exterior applications.
- Always stagger grid vertical joints. Leave minimum 1/8” space between panel joints and stop metal panel short 1/2” at ends.
- Always allow at least 24 hours for adhesive to dry before mortaring joints.
- Always use CLEAN COLD water to mix mortar. Flush hoses especially during warm weather.
- Always slightly dampen bricks before mortaring. Especially during hot weather.
Click Here To Purchase Dry Cutting Saw.
Click Here to Purchase a Splitter.
Our panels systems are manufactured to confirm with different brick heights:
- Brick Face Height - 2¼” (MOD, STA, NOR, SAX), Panel Height 8” x 48” Long, Covers 2.66 sq ft
- Brick Face Height - 2½” (Cultured Brick & Modified Standard), Panel Height 9” x 48” Long, Covers 3.00 sq ft
- Brick Face Height - 2⅝ & 2 ¾ (MST, MNR, QUE, KIN, EMD, EST, HMO, KGS), Panel Height 9.6” x 48” Long, Covers 3.2 sq ft
- Brick Face Height - 3⅝ (CLO, UTI, TIT, SQU, DUT), Panel Height 12” x 48” Long, Covers 4 sq ft
Longer 96” panels are more difficult to ship and receive therefore are manufactured to order on a special request. Larger panels do not guarantee a faster installation, so most clients guy the regular 48” panels for their jobs.
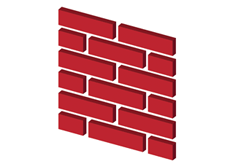
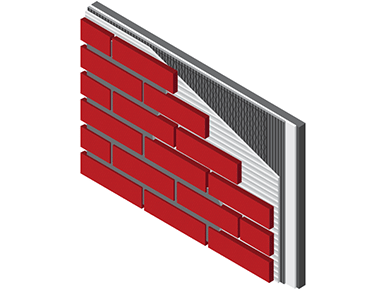
Applications that do not require corners; Install bricks in direction of arrows as shown in above illustration. Adjust vertical joints to fit area (3/8” to 1/2”) to fit wall space. Cut end bricks as needed. Install bricks horizontally than vertically. Draw a plumb vertical line every 48” to help maintain spacing.
System Page Link:
https://brickit.com/systems/systems-dmg
How To Brick It Video Link:
https://brickit.com/how-to-brick-it
DMG System Installation Instructions:
https://brickit.com/files/product_files/installation-instructions-dmg.pdf
System Page Link:
https://brickit.com/systems/systems-dmg
How To brick It Video Link:
https://brickit.com/how-to-brick-it
System Page Link:
https://brickit.com/systems/systems-dmg
System Page Link:
https://brickit.com/systems/systems-dmg