Frequently Asked Questions

Curved Wall
To achieve a curved wall multiple patterns can be used. You can start with a running bond however if the design becomes too “choppy” a header or solder pattern can be used – it’s all up to the decision maker. As to the minimum radius, it’s hard to determine without knowledge of a brick's size and pattern. As a general rule the shorter the brick the “tighter” the curve can be achieved. Often, designers/architects can get a better visual by drawing this in CAD using true brick dimensions and true curve dimensions. You'll be able to find some additional technical information in the link below: 
https://brickit.com/files/product_files/curved-brick-walls.pdf

https://brickit.com/files/product_files/CurvedWallImage.jpeg 
We are looking to use the system to span between plywood substrate and concrete foundation?

Installation over plywood and concrete should be treated as two separate areas separated by the caulk joint that allows movement. However, in residential, small installation, most customers will take an educated risk and treat this as one installation without the often ecstatically unpleasant caulk joint. This is entirely the customer’s call, and Brick It cannot be held responsible in case of failure even if the chances of that occurring are low.

What Is A Batten Plate?
Button plate is basically a structural 16-gauge L shape galvanized steel with screw holes 16” on center, that in combination with special screws creates safe fastening substrate to receive our Metal Grids, laths for Thickset system, or even cement stucco and other siding cladding materials.

For more information on Batten Plate, click on this text here.
 
Brick Breakage and Waste.
In the estimating procedure, determine the net quantities of all brick, before adding any allowances for waste. Allowances for waste and breakage vary, but as a general rule, at least 5 percent is added to the net brick quantities delivered to the jobsite. Particular job conditions or experience may warrant using a higher percentage for waste. 

Credit: Brick Industry Association 
Estimating Brick Masonry
There are various methods to estimate material quantities on a project. Hand calculations and computer programs have been used depending on the complexity of the building. Because of its simplicity and accuracy, the most widely used estimating procedure is the “wall-area” method. It consists merely of multiplying the net wall area (gross areas less areas of openings) by known quantities of material required per square foot (square meter). 

Credit: Brick Industry Association 
Movement, Expansion & Contraction Joints

Thin brick veneers may experience differential movement as the brick expand and the substrate or mortar bed shrinks. To accommodate this movement, a system of movement joints should be installed through the entire layer of adhered thin brick veneer. If movement joints are not placed properly or are not used at all, cracking may occur.

Spacing. The distance between movement joints should not be more than 18 ft (5.5 m) either vertically or horizontally. Areas between movement joints should not exceed 144 sq ft (13.4 m²). Veneer areas between movement joints should preferably be square in shape but may have a maximum length-to-height or height-tolength ratio of 2½ to 1. Where thin brick veneer is adhered to a masonry or concrete substrate, the movement joints through the veneer should be installed directly over and aligned with movement joints in the substrate. Where thin brick veneer is installed on studs, the movement joints through the veneer are not necessarily required to be aligned with movement joints through the sheathing on the studs. Where lath or mesh are used, attachment should allow free movement of the veneer between movement joints.

Construction. Movement joints should extend from the exterior surface of the adhered veneer to the substrate beneath the thin brick. Alignment of movement joints with those in the substrate is more easily achieved when they are formed during installation of mortar beds. A compressible filler strip set during mortar placement can provide the space needed for the joint as well as aid in keeping the joint free of mortar or other obstructions. At the exterior surface, a backer rod and sealant prevent water penetration, as shown in Figure 7. Movement joints must be at least as wide as joints in the substrate that they are placed directly over. The minimum recommended width of movement joints through adhered veneer is ⅜ in. (10 mm). In thick set applications, lath or mesh reinforcement should stop on each side and not continue through the movement joint, as shown in Figure 8.


Credit: Brick Industry Association 
Foundations & Grade
Figure 6 shows a typical foundation detail for thin brick veneer. The International Residential Code (IRC) and International Building Code (IBC) require exterior applications of thin brick veneer over stud walls to be installed a minimum of 4 in. (102 mm) above grade, a minimum of 2 in. (51 mm) above paving, and a minimum of ½ in. (12 mm) above exterior walking surfaces supported by the same foundation. The thin brick are required to extend a minimum of 1 in. (25 mm) below the top of a concrete or masonry foundation wall.


Credit: Brick Industry Association
Flashing/Weep Screed

Flashing is a material that collects water drained from the veneer assembly and directs it out of the wall through weeps. Building codes require flashing and weeps at the following locations:

  • Beneath the first course of veneer above final grade. The IRC requires the flashing (or weep screed) to extend a minimum of 1 in. (25 mm) below the foundation plate line for exterior applications over stud walls. To promote drainage, install the first course of veneer directly above the flashing or screed, without a mortar/grout joint.
  • At points of support, such as shelf angles, lintels and structural floors.
  • At wall and roof intersections.
  • At the heads, jambs and sills of exterior window and door openings.
  • At the intersection of chimneys or other masonry construction with frame or stucco walls.
  • Under and at the ends of copings and sills.
  • Where exterior porches, decks or stairs attach to a wall or floor assembly of wood or steel stud construction.

The flashing or weep screed should extend to the exterior wall surface or beyond, with the back edge (attachment flange) turned up at least 3½ in. (89 mm) vertically. The water-resistive barrier should lap over the flashing or weep screed. In assemblies with two layers of water-resistive barrier installed over a wood-based sheathing, direct the flashing between the layers. Extending flashing beyond the wall surface to form a drip is recommended. When using a flashing that deteriorates with UV exposure, a separate drip edge or weep screed can accomplish this. When a drip edge/weep screed is not used, such flashings should stop, or be cut, flush with the face of the wall. Typical head, jamb and sill flashing details are shown below.


Credit: Brick Industry Association
Water-Resistive Barrier and Means of Drainage
The International Residential Code (IRC) and International Building Code (IBC) require exterior walls to include a water-resistive barrier and a means of draining exterior water that enters the assembly, with a few exceptions. The water-resistive barrier must be installed over the sheathing or studs of frame wall assemblies but may be omitted over concrete or masonry walls designed and flashed in accordance with applicable code requirements. Exterior wall assemblies that demonstrate resistance to wind-driven rain through testing in accordance with ASTM E331 under code-prescribed conditions are also exempt from the water-resistive barrier and means-of-drainage requirements.
The code indicates that a water-resistive barrier can be either one layer of No. 15 asphalt felt complying with ASTM D226, Type 1, or other approved material. As noted in the 2009 IRC Commentary [Ref. 2], field experience, and testing [Ref. 7] have shown that using two layers of building paper in exterior applications of stucco considerably decreases the penetration of moisture. Where installed over wood-based sheathing, the IRC and IBC require two layers of vapor-permeable water-resistive barrier with a performance equivalent to two layers of Grade D building paper, or a single layer of water-resistive barrier with a water resistance equal to or greater than 60-minute Grade D paper that is separated from the veneer by a designed drainage space or a layer of material that does not absorb water. These codes do not indicate specific materials or methods that qualify as providing a means of drainage; however, products such as drainage mats are often used to meet means-of-drainage requirements. Because they are specifically designed to provide the separation and means of drainage required by code, the inclusion of designed drainage spaces or drainage mats, as shown on our MCS and CI systems pages, is preferred. A water-resistive barrier is not required for interior applications but may be beneficial in protecting building materials from moisture during installation. For further information, refer to the IBC [Ref. 1] and IRC [Ref. 2]. 
Deflection

For thin brick veneer with a substrate of masonry or concrete, deflection is not a concern, because the flexural stiffness of the veneer is similar to that of masonry and concrete. When the substrate wall is wood or steel stud framing, out-of-plane deflection of the framing must be considered, because the stiffness of the veneer can be substantially greater than the stud framing. The IBC limits the deflection of stud framing to a maximum of L/240 when rigid finishes like thin brick are applied. For interior adhered veneer applications supported by wood floors, the IBC limits the vertical deflection of the floor system to L/600. To decrease potential cracking and the potential for the veneer to separate from the stud framing, a wall deflection limit of L/360 is recommended when a wood or steel stud framing substrate is used.

Can I Hang Pictures, Awnings And Fasten Other Things On The Thin Brick Veneer?
Thin veneers do not have structural values. Generally, we do not recommend fastening or hanging things on the veneer. It is much better practice to fasten things to the wall behind, and veneering into it. Example: Hanging sconces on the J Box is acceptable where the J box itself is fastened to the wall. Also, please make sure the installation is watertight.  
Thermal Panel Movements.
When installing panels we want live abut 1/4" gaps for expansion and contraction. 

In over 30 years of experience with thin brick panel systems, we have never experienced any issues with the expansion and contractions of the panels. If you are still concerned, we recommend the use of our silicone thin brick adhesive which never hardens when fully cured. 
How Far Will The Brick Stick Off The Existing Wall Using CI System?
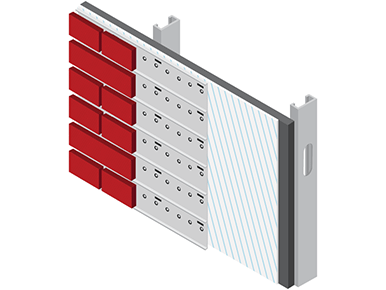
Metal Panel System is "paper thin" (+/- .016") and it doesn't add a significant amount to the overall thickness. When calculating the overall system thickness of the MCS system we add the brick and all the rest of the system components thicknesses together. 

Brick thickness can be obtained on the product page in the shape and sizes tab. 
How Far Will The Brick Stick Off The Existing Wall Using MCS System?
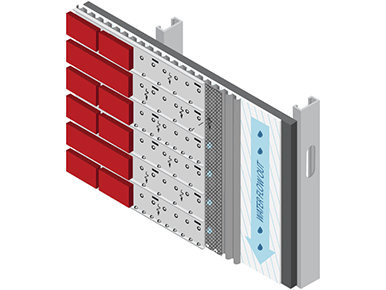
Metal Panel System is "paper thin" (+/- .016") and it doesn't add a significant amount to the overall thickness. When calculating the overall system thickness of the MCS system we add the brick and drainage matt thicknesses together. 

Brick thickness can be obtained on the product page in the shape and sizes tab. 
How Far Will The Brick Stick Off The Existing Wall Using DMG System?
Metal Panel System is "paper thin" (+/- .016") and it doesn't add a significant amount to the overall thickness. Basically, the thickness of the brick is all we consider when calculating the overall system thickness of the DMG system. 

Brick thickness can be obtained on the product page in the shape and sizes tab. 
Metal Grid System (DMD or MCS) Versa Conventional Systems
Conventional systems are typically slow and require more involved installation. For comparison reasons, mechanic using a conventional system will install an average about 250 bricks per day versa about 1,200 bricks over metal panel system.

Thin set system will occasionally be used on small interior jobs like a kitchen backsplash or concrete stoop up to 100sqft in size.

Thick set systems are rarely used on jobs as the material costs slightly less expansive, but the labor is much more involved and in the end, the costs are much higher. 
USGBC LEED Credits

  1. Product contains pre-consumer recycled content
  2. Product contains post-consumer recycled content
  3. Product is recyclable or biodegradable after use
  4. Product contributes to USGBC LEED-NC v2.2 and LEED 2009 credits, www.usgbc.org
 

Materials and Resources

  • MR Credit 3 - Resource reuse
  • MR Credit 4 - Recycled content
  • MR Credit 5 - Local/regional materials

Indoor Environmental Quality

  • EQ Credit 4.1 - Low-emitting adhesives and sealants

Innovation and Design Process

  • ID Credit 1 - Innovative design features

Do I Need To Frame My Wall In A Special Way To Receive Continuous Insulation System?
There is always an option of strapping entire wall every 16” OC for easier installation. We understand that this will add some extra cost to your job, so we recommend doing it at least strapping inside and outside corners. This will assure proper Batten Plate installation in those locations.
 
How Do I Install Batten Plate Into The Foam? Does The Foam Need To Be Notched?
If you buy the foam from us it will come notched every 16” on center. Simply press it in place, or if you find that a bit difficult, it can be tapped in place using a rubber mallet.

 
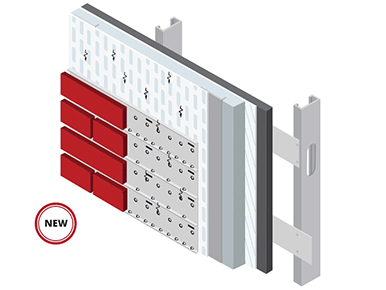
How Strong Is The Ci System? How Much Will It Hold?
With a use of our structural Batten Plates and special screws, based on our tests we can hang about 450 LB per square foot of material in the worst-case scenario. In a more typical setting (no strapping), system will hold up to 650LB per square foot.

FYI, Our Typical System Installation Hang Over Batten Plates Will Weigh About 7 Lb Per Square Foot!

 
Why Can’t I Just Fasten Your Dmg Of Mcs Panel Directly To The Stud, Thru The Foam With Longer Screws?
Please keep in mind that foam does not have any structural values. When combined with gypsum sheeting, you would be overhanging the system buy whatever the thickness of the foam is away from the stud, point of fastening. We do not believe this is a good idea and we have never met an engineer that would sign off on such installation.
 
Do You Have Instructions On How To Install?
In our VIDEO section you can find three-part detailed video. You might find it a bit long and perhaps outdated but its time well spent. The gentleman in that video is Brick-It’s inventor. He speaks from his heart, and for sentimental reasons we don’t have a heart to replace it.

Please click here and see it for yourself.
 
Can Continuous Insulation System Be Used In A Residential Application?
It is an option for you but most lumber constructed walls with the latest insulating technology meet energy codes and our CI system is not required.
 
Doesn’t The Screw Provide Thermal Transmittance?
We achieve 100% thermal break by using none condensate eyelet (washer), and foam drainage matt.

For Eyelet product details click on this text here.
 
What Is A Typical Application For Ci System?
Usually our CI system is installed on commercial jobs in steel stud and gypsum sheeting wall construction.
 
Why Did You Switch From A Round Holes To Rectangular Ones In Panels?
During our system developments and testing, we discovered that water tends to go around a round hole and not in it. This is especially true when the hole is punched from the back of the panel that creates a microscopic burr. Based on that finding we have redirected the direction and shape of the punch.
 
Which Moisture Barrier Should I Use?
We are not a water barrier manufacturer and will not be your best resource for that question but:
There are many on the market. Lately there seem to be a standard to use two layers of something. One could be a roll on applied and another paper, or two layers of paper etc. There are actually 2-ply papers on the market where two sheets of paper unroll together from a roll. Please pay extra attention to your water barrier, as this is the step that stops the moisture, not the brick and mortar.

For more moisture control products offered by us click on this text here.


Is Moisture Control System (MCS) System More Expensive Than DMG?
It is a bit. Drainage matt has extra system components and the galvanized coating is a higher grade. We say that it is like an insurance policy, and the only way to know if it’s worth it to you is to quote it. The choice is yours.
 
What’s Moisture Control System?
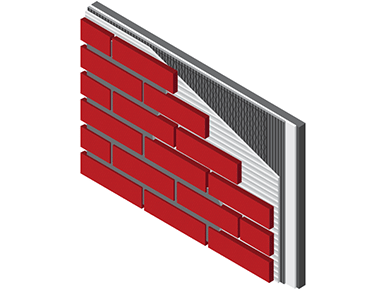
This system has all the futures of our Metal Grid System with moisture management capabilities. The idea is to take 100% of water from the front of the panel and redirect it to the back every 8”. We accomplish that with strategically placed offset weep holes.

It is the only patented thin brick installation moisture control system available.
United States Patent #8,141,310
 
What’s The Purpose Of The Drainage Matt?
Our high impact drainage matt provides rapid exit for water which is naturally absorbed by brick and keeps free air flow between the veneer and the wall.

For more product details click on this text here.
 
Few Installation Tips
  • Always anchor grid to substrate securely with adequate fasteners. Concrete and masonry walls require fasteners and adhesive on rear of metal grid.
  • Always use a waterproof covering to protect substrates before installing gird in all your exterior applications.
  • Always stagger grid vertical joints. Leave minimum 1/8” space between panel joints and stop metal panel short 1/2” at ends.
  • Always allow at least 24 hours for adhesive to dry before mortaring joints.
  • Always use CLEAN COLD water to mix mortar. Flush hoses especially during warm weather.
  • Always slightly dampen bricks before mortaring. Especially during hot weather.
Can I Use A Sponge To Finish The Joints? Like A Tile Installer Would Do?
We do not recommend that technique because most of the bricks cannot be cleaned off in a similar way to the tile. Mortar simply doesn’t come off the face and might leave a permanent stain on the face of the brick. However, that might be your desired finish…? Please test your idea techniques on the sample panels and not on a main wall.
 
How Do I Point / Grout Thin Brick?
Place entire content of a bag (40lb) of Brick It supplied mortar mix into a 5 gal. bucket. If you’ve ordered a colored mortar mix from us, you should have another small color pack bag (1.5lb). Please add the entire content of the colorant bag to that same 5 gal bucket. Add cold water slowly until mortar is thoroughly mixed. Use a mortar mixer with 1/2” drill - slow speed, (approx. 450-550 rpm) mortar is properly mixed when it flows out of mortar bag. Try a small sample area.

Apply mortar into joints. Horizontal first, then vertical. Over fill joints with sufficient mortar to avoid leaving any voids. When mortar attains a firm consistency (check every 3 to 5 minutes) joints are ready for tooling.

Use the joint tool supplied with the mortar kit to strike joints. Strike the vertical joints first than horizontal joints. The joint tool is to ensure that the depth of the mortar joint does not exceed 1/8th of an inch below the face of the brick. Press the tool against the joint at a 45 degree angle and strike joint. This will fill and seal the mortar to the edges of the brick. Joints will have a con- cave finish. Fill any voids.

DO NOT MORTAR JOINTS WHEN DAY & NIGHTTIME TEMPERATURES ARE BELOW
40 DEGREES F.
 
What Tools Do I Use o Cut Thin Brick?
Bricks can be cut using a diamond blade. Tile saws are often used. However, we find a splitter to be a very useful tool.
 
Click Here To Purchase Dry Cutting Saw.

Click Here to Purchase a Splitter.


What Do I Use To Fasten Metal Grid Panel To The Wall?
Generally speaking: Non-Corrosive preferably ribbed fasteners with sufficient penetration to firmly secure grid to wall.

Our offerings can be found here. Click on this text.
 
What Tools Are Required To Install Thin Brick?
Basic tools are required for most thin brick installations. We have them listed in the below link:

Click on this text.
 
What Is The Size Of The Panels?
Generally, our panels accommodate three courses of brick therefore panel height will vary depending on the brick size. Panels also come in two lengths: 48” & 96”.

Our panels systems are manufactured to confirm with different brick heights:
  • Brick Face Height - 2¼” (MOD, STA, NOR, SAX), Panel Height 8” x 48” Long, Covers 2.66 sq ft
  • Brick Face Height - 2½” (Cultured Brick & Modified Standard), Panel Height 9” x 48” Long, Covers 3.00 sq ft
  • Brick Face Height - 2⅝ & 2 ¾ (MST, MNR, QUE, KIN, EMD, EST, HMO, KGS), Panel Height 9.6” x 48” Long, Covers 3.2 sq ft
  • Brick Face Height - 3⅝ (CLO, UTI, TIT, SQU, DUT), Panel Height 12” x 48” Long, Covers 4 sq ft

Longer 96” panels are more difficult to ship and receive therefore are manufactured to order on a special request. Larger panels do not guarantee a faster installation, so most clients guy the regular 48” panels for their jobs.
 
How Do I Install Bricks Using Panel System?
Place adhesive on the back of brick vertically or in the forms of dabs a size of a quarter. Install one row of bricks to check layout. Always start with the corner brick, or a corner brick at-each corner if there are comers at both ends. Install bricks adjusting vertical joints for fit or cut brick as required.

Applications that do not require corners; Install bricks in direction of arrows as shown in above illustration. Adjust vertical joints to fit area (3/8” to 1/2”) to fit wall space. Cut end bricks as needed. Install bricks horizontally than vertically. Draw a plumb vertical line every 48” to help maintain spacing.


System Page Link:
https://brickit.com/systems/systems-dmg

How To Brick It Video Link:
https://brickit.com/how-to-brick-it


DMG System Installation Instructions:
https://brickit.com/files/product_files/installation-instructions-dmg.pdf


Miami Dade Florida Product Approval.
Code Version 2014
Brick It panel system is approved in Miami Dade County.

Code 2014 is accepted, but Brick It is working on a new version of approvals.  

In order to find the approval:
  1. Please visit Florida DBPR website: https://www.floridabuilding.org/pr/pr_app_srch.aspx
  2. Enter code version 2014
  3. Enter FL# text box with 14427
  4. Click Search
Insulation, How Much R-Value Do Brick It System Add To The Wall Composite?
Our Continues Insulation System (CI) will provide additional R5 of insulation value per each inch of the foam thickness to the wall composite. Drainage Mat DC14 will add R1. 

Unfortunately Thin Brick by itself will only add insignificant amount of approximately R0.05 of insulation.
How Do I Fasten Panel To The Wall?
The grid has an interlocking top and bottom edge to help maintain level. Always check for level after installing a number of rows. Always offset vertical grid joints and leave 1/8” between joints. Figure brick to extend pass grid by 1/2” at grid ends. Notch ledges and bend the grid to adopt to outside corners. Use one fastener for each brick raw every 16”.

System Page Link:
https://brickit.com/systems/systems-dmg

How To brick It Video Link:
https://brickit.com/how-to-brick-it


Is DMG Panel System Interior Or Exterior Product?
This is the system of choice for interior applications, but it’s also used on exteriors of buildings. However, we do preferer the use of our MCS Panel in exterior applications.

System Page Link:
https://brickit.com/systems/systems-dmg
 
How Heavy Is The DMG System With Brick And Mortar Combined?
It will depend on the brick type and thickness. Complete system installed usually weights about 7 lbs per square foot.

System Page Link:

https://brickit.com/systems/systems-dmg

 
What Are The Features Of The DMG Panel?
The largest advantage of a roll formed panel is that it has continuous ledges. Not only they add to rigidity but also allowed us to create “tong and groove” locking system for easy installation. We also install linear area of adhesive holes. Those allow adhesive to sip through them and bridge any oil canning that commonly occurs when fastening sheet metal. You will also find punch outs for the mortar to lock into it. Panel Systems allows proper brick alignment every time.


Can Brick It Panel System Be Used With Other Manufacturer’s Brick?
Yes. It must conform to one of the US standard sizes. Please check your thin brick height and match it with our panel size.
 
What Type Of Contractors Do This Kind Of Work?
The answer will depend on the type of your project, but Stucco Contractors, Masons, Carpenters, and Tile Setters are capable of handling the installation. We have also seen Landscapers, Plumbers, Electricians and Painters do the same.
 
Do You Have Installers In My Area?
Brick It does not install, nor it has any installers on payroll. We probably have customers that have purchased our products in your area but since we haven’t seen finished project, we cannot speak to the quality of the work or the contractor’s working ethics.

You can seek a local trusted contractor with skills in stucco installations, carpentry, tile, masonry or a handy man, and they should be able to help you.
 
I’m A Skilled Contractor, Why Should I Use Brick-It’s Panel System?
Added strength, ease of installation and the most importantly speed. Just for comparison; skilled installer using conventional system like thin or thickset can set about 250 to 350 thin bricks in a day but using metal grids that will increase from 1100 to 1400 pcs. Ohh, and most of the work is being done by one mechanic and rest of the crew consists of helpers. It’s cost effective.
 
Can a Person With Limited Construction Experience Handle The Installation? Like A Typical Homeowner?
Absolutely! Over the years we watched many people with different levels of construction skills using our metal grid system. People that completed the projects themselves have been rewarded with priceless sense of achievement and pride.
 
Which System Should I Use?
Out of all the systems that we sell, our Designer Metal Grid (DMG) panel system is the easiest, most convenient and cost effective, and by far the most popular. However, if moisture control is a concern, our MCS system should be given serious consideration. Continuous Insulation System (CI) adds a insulation with proper fastening system to meet latest building codes.
 
Why Should I Use Brick It System?
Some kind of a system is required to install thin veneers. Buying all required installation materials from Brick it is not only convenient but ensures the use of proper installation products.